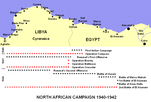
North African Campaign,
1940-1942
|
|
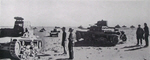
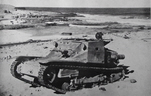
In Egypt, June 1940 saw the armoured cars of the 11th Hussars (Prince Albert’s Own) under Lt Col John Combe close to the frontier. With instructions to ‘raise hell’ they conducted a series of hit-and-run raids, attacked forts and shooting up supply columns. By 12 June, all their patrols had returned without suffering a single casualty, as well as bringing back some seventy prisoners, most of who were still in the dark about Mussolini’s declaration of war. Encouraged by this, plans were laid to assault the Forts Maddalena and Capuzzo and the attacks were launched on 14 June. The Hussars were joined by elements from the 4th Armoured Brigade (led by Brigadier J R L ‘Blood’ Caunter – so-called due to his favourite exhortation ‘Buckets of blood!’) and 1st Battalion, Kings Royal Rifle Corps. Fort Maddalena fell without a shot, as the vast majority of the garrison had already abandoned it, and while some resistance was encountered at Fort Capuzzo, the fort fell without bloodshed. Six Italian Fiat-Ansaldo L3 Tankettes appeared, one of which was engaged and knocked out by a Boyes anti-tank rifle, the others withdrawing rather quickly.
Two days later, two troops of 11th Hussars were moving about between Sidi Omar and Fort Capuzzo when both troops encountered an Italian convoy with L3s and lorries carrying infantry on their way to re-garrison the fort. Despite receiving orders to withdraw, both troops charged forward and engaged the Italians. They managed to knock out three of the L3s and retire behind a slight rise when one of the columns produced a field gun. Combe gathered all the reserves that were available including a mixed squadron of light and cruiser tanks from 7th Queens Own Hussars and an anti-tank troop of the Royal Horse Artillery from 4th Arm’d Bde and moved quickly to join the action. When they reached the rise, Combe was staggered to see the Italians some three miles away in the open formed up in square as if fighting some colonial tribesmen. Unsure if the Italians had more artillery, Combe sent forward some of the tanks, which were fired at by the lone artillery piece and charged by the L3s. These were knocked out with one shot each and the tanks then proceeded to shoot up the unprotected infantry and lorries. After two complete circuits the Italians produced hidden guns at the corners of the square and there followed a bitter and intense firefight where the gallant gun detachments were all but decimated. The square broke and was rounded up, with barely 100 men going into captivity. Thus ended the ‘Battle’ of Nezuet Ghirba.
Desert conditions impose considerable wear and tear on equipment, especially vehicles and so in mid-August, 4th Armoured Brigade was replaced by 7th Armoured Brigade and 7th Armoured Division’s Support Group, led by Brigadier W H E ‘Strafer’ Gott. His orders were to impose delay if the Italians decided to advance into Egypt with his two infantry battalions, artillery and supporting elements. Neither side made any real territorial acquisitions during the early stages but really used it to test equipment, tactics and morale.
Despite assuring Hitler that preparations for the invasion of Egypt would be complete by 17 July, Mussolini was still waiting in early September, whereupon his patience snapped and he issued an ultimatum to the commander in Libya, Maresciallo (Marshal) Rodolfo Graziani, invade or be sacked. Graziani (who was continually plagued by a shortage of transport) quickly modified his plans and started preliminary moves on 9 September. Responding to heavy air attack and rumours of British armoured forces south of the escarpment, he modified his plans once again and started moving along the northern coastal plain. At this point, the sole British presence was a platoon of the 3rd Battalion, Coldstream Guards who promptly withdrew, covered by the Royal Horse Artillery (RHA) and RAF. Finally, the Italians made it to Sidi Barrani where they started to dig in and await reinforcements and supplies, watched by the 11th Hussars. During this period, Mussolini decided to invade Greece and while things initially went well, the Greeks had no intention of being occupied and turned the tables on the invaders, threatening Albania in the process. Reinforcements would not be forthcoming. Back in Egypt, the British were determined that they, and not the Italians should control the 70 miles that separated the two armies and so instigated a number of small all-arms patrols dubbed 'Jock Columns' to enhance the reconnaissance being carried out by 11th Hussars, protect them and dominate No-Mans Land. Two such columns were operating by October, but other groups were involved in raiding as well. One such raid took place on the 23 October by the 2nd Battalion, Queen's Own Cameron Highlanders and 8th King's Royal Irish Hussars on Maktila Camp but found that the Italians were ready and waiting for them. The British managed to extricate themselves without serious loss but a valuable lesson was learned – the raid had been compromised by gossip in Cairo, home to many Italian nationals and spies and operational security would have to be much tighter in future. The Italians seemed to be content in their fortified camps and concentrated improving their defences, surrendering No-Man's Land and the initiative to the British. At sea, things were much the same, with the RN getting the better of the opening moves, while in the air, the lone Hurricane was used as much as possible to bluff the Italians there were in fact many of them. The Regia Aeronautica fought back hard though and bombed Alexandria, Malta and RAF Bases.
Yet in early September, just when the threat of invasion was at its height, Wavell was considering ways to strike and requested a study being undertaken as to possible ways they could strike at Tobruk. Also, the Apology Convoy arrived from Britain which brought 7th Armoured Division up to strength as well as fifty precious Matilda tanks, half the number then available. A number of Hurricanes started to arrive as well, via the Takoradi reinforcement route through West Africa. It was apparent that the Italians were building permanent field fortifications and the British had very good signals intelligence as to their dispositions and intentions, along with the intercepts of Luftwaffe signals, indicated that the Germans were unlikely to intervene. All this was upset by the Italian invasion of Greece with the insistence from London that help be sent to the Greeks. This of course put the raid in jeopardy and so Wavell informed Anthony Eden, the Secretary of State for War. Eden informed Churchill, who was delighted but continued to harangue Wavell to release men and equipment as soon as possible for the Balkan campaign. Lt Gen Richard O'Conner and Lt Gen Sir Henry 'Jumbo' Wilson devised a plan based around Wavell's desire for mobility. The British forces would pass through the Ebna Gap with 4th Indian Division moving northwards to take the camps from behind, 7th Armoured Division screening to the west and south, while 'Selby' Force from the Mersa Matruh garrison would move along the coast road. Logistical problems would be solved by the creation of Forward Supply Depots (FSDs), with Nos. 3 and 4 holding enough fuel, food, water and ammunition for five days of activity, in No-Man's Land. The setting up of these depots was screened by 'Jock' Columns and a sharp clash occurred on 19 November with an Italian force in the Ebna Gap. Intensive training by the British culminated in 'Training Exercise No. 1' which had British forces practicing to attack exact replicas of the Italian camps. After this, Wavell gathered his senior staff together on 26 November and briefed them on 'Training Exercise No. 2' – Operation Compass.
Further west, 11th Hussars had managed to cut the coast road to the west of Sidi Barrani by around 09.00, quickly followed by 7th Hussars cutting telephone lines and water supplies then moving on the Wadi el Kharruba, while 4 Arm'd Bde were southeast of Buq Buq. O'Connor had 8th Hussars patrol west of the Sofafi Camps in order to dissuade the inhabitants from evacuating. He ordered 16th British Bde to attack Sidi Barrani , unaware that Selby Force had advanced west along the coast road, and 5th Indian Bde to attack Tummar East. Selby Force spent an isolated 9 December keeping an eye on Maktila, awaiting further instructions. This allowed defenders from the 1st Libyan Division to slip away under the harassing shellfire of the Royal Navy. The next morning, the 1st Btn, Argyll & Sutherland Highlanders with the 2nd Btn Leicestershire Regt on their right, attacked Sidi Barrani. They were held up by accurate shellfire, until the eleven remaining Matildas from 7th RTR with the 1st Btn, Queen's Royal Regt arrived and worked their way around to the left. In combination with a severe sandstorm and additional artillery support the battle developed from the west. With the commitment of troops from the divisional reserve, including the 4th Btn, 6th Rajputana Rifles, the battle was over by nightfall. Suddenly, on the morning of 11 December, O'Connor was faced with having achieved a complete victory and the possibility of exploitation and pursuit. Over 20,000 prisoners, 180 guns and sixty tanks had been captured for the loss of 600 casualties. As British armour was headed towards Buq Buq, O'Connor received the shattering news that 4th Indian Div (less 16th British Bde) was to be redeployed to the Sudan. This was a result of the War Cabinet's worries about the large Italian garrison in Abyssinia. Wavell promised O'Conner 6th Australian Division as a replacement but it would not be immediately available and there was the business of dealing with a huge number of PoWs and captured equipment and supplies.
The camps at Sofafi and Rabia had managed to evacuate despite the presence of 7th Arm'd Bde. They were sent off in pursuit of those Italians who had retreated to Buq Buq but found it empty. Elements of the 3rd (King's Own) Hussars passed Buq Buq and fell into an area dominated by salt pans and sand dunes and missed the presence of Italian artillery. In trying to avoid the artillery fire they became bogged down and easy targets. Elements of the 8th Hussars and Royal Artillery manoeuvred to the flank and the Italians quickly surrendered. So far, Compass had yielded over 38,000 prisoners, 237 guns and seventy-three light and medium tanks. Success had been a result of intense security but this resulted in no contingency plans for dealing with such a large number of prisoners, who posed enormous logistical problems, especially with the withdrawal of 4th Indian Div.
The Royal Navy had encouraged the columns of retreating Italians moving from Sollum to Bardia with some brief bombardments. O’Connor hoped that both towns would be abandoned, but it was unlikely in the case of Bardia. However, even Sollum had a jetty and a small bay which would mean that the Navy would be able to help with the logistics problems he faced, releasing trucks for the long trip back to Mersah Matruh, to move PoWs and to bring up petrol, food and ammunition. He stripped the Support Group of its trucks and pushed the 7th Arm’d Bde forward to move astride the Sollum – Bardia road. On 13 December, 4th Arm’d Bde passed through the gap between Halfaya and Sidi Omar in order to cut the Bardia – Tobruk road. They encountered little organised opposition, although 11th Hussars were subjected to several air attacks and were eventually withdrawn from action. 7th Arm’d Bde met stiff resistance from a rearguard near Capuzzo which prevented it cutting the road before significant Italian forces had escaped. The British attacked and captured the fort at Sidi Omar and subjected Bardia to intense air and naval bombardment while preparing to take it. The Allied forces fought a number of brisk actions with the garrisons at Fort Maddalena and Garn el Grein while the Australians moved up from Alexandria (19th Aus Bde was kept in reserve to immediately move into the town by sea should the Italians surrender). The Italians had heavily fortified Bardia and Tobruk, with Bardia having an almost continuous antitank ditch around the perimeter and a double line of underground posts linked with barbed wire, each of which was protected by its own antitank ditch, antitank guns and machineguns. The 6th Australian Division dug in with 16th British Brigade to the south and 7th Arm'd Div to the north and west.
Both sides tried to make the best of it over the Christmas period and in late December, 17th Aus Bde relieved 16th British Brigade in the south. O'Conner instructed Maj Gen Iven Mackay to develop a plan to utilise the remaining Matilda tanks as well as the Corps artillery (the Western Desert Force had become XIII Corps on 1 January 1941). The Australians would concentrate between posts 45 and 47, breaking through the barbed wire with Engineer support, after a twenty-five minute bombardment. This attack commenced on 3 January 1941 and the Engineers cleared avenues through the barbed wire with bangalore torpedoes. The lead battalion (2/1st) quickly took posts 49 and 47 in the first line and 46 in the second line in the first half-an-hour, with posts 48, 45 and 44 following soon after. Its follow-on companies reached a low stone wall where heavy but ineffectual fire slowed the advance briefly but was taken with grenades and bayonets, yielding 400 prisoners. By 06.35 tank crossing points were ready and the twenty-three Matildas of 7th RTR advanced with 2/2nd Btn, rolling up the double line of posts. Fierce resistance was encountered all along the line, but was quickly dealt with by the accompanying infantry, although to their credit, the Italian artillery fought until the last man. 2/5th Btn, with two companies from the 2/7th Btn, continued the assault but without the benefit of Matilda support. They ran up against enemy artillery firing over open sights, backed up by machine guns and were pinned down until the position had been flanked and two Matildas had appeared. Unfortunately, as the prisoners were being rounded up, one Italian shot the company commander dead and then attempted to surrender. He was thrown back in the trench and a Bren gun emptied into him, while the company 2nd-in-command had to prevent the other soldiers bayoneting the rest of the prisoners. This incident was witnessed by the Italians in Post 25 who promptly surrendered and by 15.00, 2/5th Btn had reached Post 20, although without the two Matildas. The Australians had captured some 3,000 yards of the perimeter defences and half the Switch Line. The 2/6th Btn, while designated to conduct a feint attack was accidentally asked to capture the line between Posts 3 and 11. It was to be a long day for the battalion, in the face of determined Italian resistance centred on Post 11. The Aussies managed to breach the perimeter but were thrown back and had to content themselves with surrounding it. There were a number of determined Italian counterattacks but by the end of the day, the battalion had captured 600 yards of the north bank of the wadi, as well as Post 7 and part of Post 9.
O'Conner met with Mackay and agreed that 19th Aus Bde should be introduced to clear the Italian artillery positions to the south, while 16th Aus Bde continued to advance either side of the town and as 17th Aus Bde was exhausted, it was told to stand fast. The attack went smoothly and on 5 January, the brigade captured thousands of prisoners (including two divisional commanders) and an enormous amount of stores. The commander of Post 11 finally accepted that honour had been satisfied with the appearance of two Matildas and surrendered. As Lt Col Godfrey moved forward to shake hands, some 350 Italians poured out of the post, normally garrisoned by a platoon. The Allies had suffered some 500 casualties, but had taken over 38,000 prisoners, captured twenty-six coast defence guns, seven medium guns, 216 field guns, twenty-six heavy AA guns, forty-one infantry guns (65mm), 146 antitank guns, twelve serviceable medium tanks, 115 L3 light tanks and 708 motor vehicles.
19th Aus Bde moved up to 4th Arm'd Bde and then deployed opposite the Italian fortifications surrounding Tobruk. This again consisted of two lines of underground strongpoints, fronted by barbed wire and an antitank ditch. They were eventually joined by 16th Aus Bde who moved into the line on their left. They set up an aggressive patrolling regime but discovered that there were a large number of booby traps that caused casualties. It was decided that the Allied forces would breakthrough the defences between Posts 55 and 57, the general scheme of attack being similar to that used at Bardia, with 6th Aus Div breaking into the position and 7th Arm'd Div providing a screen to the south and west until the Aussies had opened up a gap for the tanks of 7th RTR to exploit. O'Conner was keen to continue the advance to Mechili but logistics were quickly becoming seriously stretched with fuel and spare parts in short supply. The attack was postponed until 21 January to allow as many Matildas to be available as possible and for additional fuel to come up. Within 7 Arm'd Div, 8th Hussars and 6th RTR handed their remaining serviceable vehicles over to 3rd and 7th Hussars as well as 1st and 2nd RTR, before departing to Alexandria, leaving each armoured brigade with only two regiments apiece. The remaining Matildas were moved with the help of heavy artillery tractors to minimise wear on their engines.
In preparation for the assault, Blenheim and Wellington bombers, as well as HMS Terror and her accompanying flotilla bombarded the Italian positions, after which the British artillery opened fire with everything it had. The 2/3rd Btn advanced led by engineers from the 2/1st Fd Coy RAE. After dealing with the wire, the Aussies quickly took Posts 56, 54 and 55. This time, the men only wore leather jerkins, their weapons, ammunition and a filled haversack, increasing their ability to move quickly. The 2/3rd Btn was followed by the 2/2nd Btn and 2/6th Btn, both supported by armour, although some units were separated by a thick fog of dust and sand that had been thrown up. 2/8th, 2/4th and 2/11th Btns all advanced from their start line, deep into the Italian position, with 2/4th Btn capturing the sector headquarters, some 1000yds beyond the main road. 2/8th Btn came across a number of stationary tanks that were dug in and supported by artillery and strongpoints. They set to work reducing these, after which they continued to advance on Fort Pilastrino, while 2/4th Btn moved towards Fort Solaro and 2/11th Btn marched on to seize the escarpment overlooking the harbour. 2/8th Btn encountered some resistance from a number of Italian light tanks and antiaircraft guns but occupied Fort Solaro without a fight, capturing the Corps Headquarters (under Generale Manella) in some caves nearby. 2/3rd Btn continued to work its way round the perimeter and had captured Posts 39 and 36 by 15.00. The fighting lulled over night but the next day, Mackay gave orders for the final blow to be delivered. 7th Arm'd Div attacked from the west, while 16th Aus Bde moved north, while 2/4th Btn with some Matildas entered the town at 10.20. The Italian Naval Headquarters surrendered and all organised resistance had ceased by noon. The Allies captured some 25,000 prisoners, 208 field and medium guns, 23 medium tanks and over 200 other vehicles, along with wells and water distilleries that could produce 40,000 gallons a day – for the cost of some 355 casualties (49 killed).
The Aussies faced occasional counterattacks as they tried to shift the Italians from the Wadi Derna and 2/11th Btn faced stiff resistance as it captured Fort Rudero. The Italians had sited their artillery very well and could bring down huge volumes of fire. The Australians kept probing forward and the pressure finally paid off with the Italians abandoning Derna and the surrounding area on 30 January. To the south and west of Derna lay the Jebel Akhdar (the Green Mountains) which would prove to be tough going. O'Connor's plan to outflank the Italians around Benghazi would rely on continuing the pressure through the mountains but also the refurbished 7th Arm'd Div. The opening of Tobruk harbour would certainly help, but O'Connor paid tribute to the work of the transport companies who were vital in moving equipment and supplies. The remaining reliable vehicles were concentrated in 4th Arm'd Bde so it was ready to resume the advance when the operation began. Brigadier Eric 'Chink' Dorman-Smith returned to Cairo and appraised Wavell of O'Connor's plans. He returned on 2 February to find that the Australians were in Giovanni Berta with the Italian defenders in front of them having gradually disappeared. Graziani had decided to move back closer to Tripoli as three large motorised convoys had been seen heading south – the Allies would have to move quickly if they were to catch the remaining Italian forces. If O'Connor decided to try and surround them, it would mean a 150-mile trip through the desert over rough terrain with little time to build up additional supplies or the two new regiments of tanks.
4th Arm'd Bde set off on 4 February and the going proved to be as bad as had been feared with the rough terrain slowing the pace of the advance and leading to increased fuel consumption. 11th Hussars managed to move quicker once they had reached better ground and took Msus. A lone Hurricane on reconnaissance reported that a large motorised column was moving south from Benghazi and Creagh took two decisions that were to impact the remainder of the campaign. First he decided to move southwest towards Beda Fomm and Sidi Saleh instead of westwards from Msus to Solluch. Secondly, as the tanks would need more maintenance and supplies were in need of replenishment, he formed a wheeled vanguard that could move quickly ahead of the main force and cut the main road, in the hope of cutting of the retreating Italians. The vanguard would be known as Combeforce (under Lt Col Combe of the 11th Hussars). It would consist of C Sqn, 11th Hussars; A Sqn, 1st King's Dragoon Guards; 2nd Btn, Rifle Bde; C Battery, 4th RHA with 25-pdr guns and nine 37mm Bofors antitank guns mounted on lorries, from 106 (Lancashire Hussars) RHA (they also operated captured 20mm Breda AA guns). Assembling this force presenting severe logistical difficulties as many of the vehicles were spread along the entire divisional column and the 4 RHA vehicles had to unload their reserve ammunition and take on fuel, while additional communications had to be set up to link Combeforce to the divisional net.
 Latimer, Jon. Operation Compass 1940: Wavell’s Whirlwind Offensive, Latimer, Jon, Osprey Publishing, Oxford, 2000, Campaign Series No. 73.
|


|
 The British Army 1939 – 45 (2) Middle East & Mediterranean, Brayley, Martin J., Osprey Publishing, Oxford, 2002, Men-At-Arms Series No. 368. Part two of a three part look at the British Army during the Second World War, this book provides a good summary of the fighting around the Mediterranean, including North Africa and Italy, looks at the special uniforms needed in these theatres and includes an overview of the British Artillery. [see more]
 Alamein: War Without Hate, Bierman, John & Smith, Colin, Viking, London, 2002.
|
|
 The Imperial Museum Book of the Desert War 1940 – 1942, Bramall, Field Marshal Lord and Gilbert, Adrian. (Eds), Sidgwick & Jackson, London, 1992.
|
|