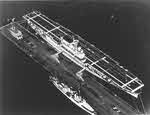
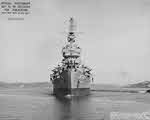
USS Chester (CA-27), Mare Island Navy Yard, 16 May 1945
|
|
The battle of the Coral Sea (3-8 May 1942) ended as the first major Japanese setback of the Second World War, and marked the end of the period of rapid Japanese expansion across the Pacific that began after the attack on Pearl Harbor. By the early spring of 1942 the Japanese high command was faced with an unexpected problem. All of their initial objectives had been achieved at far less cost than expected, and rather than consolidate their defensive perimeter, the various power groups within the Japanese armed forces each began to press for further expansion. The Army wanted to concentrate on the war in China. The Naval General Staff wanted to attack either west to Ceylon and India or south to Australia. Finally Admiral Yamamoto and the staff of the Combined Fleet wanted to move east, occupy Midway, Johnston and Palmyra Islands, and once again threaten Hawaii, forcing the American fleet to come out of port for the decisive battle that the Combined Fleet believed would win the war for Japan. At first the Naval General Staff got their way, and plans were put in place for an attack on Port Moresby, on the southern coast of New Guinea, but after the Doolittle Raid on Tokyo on 18 April 1942 Yamamoto got his way. The main Japanese attack in the summer of 1942 would be the thrust east that ended with the battle of Midway. Despite this change of plan, the Naval General Staff decided to continue with Operation MO, the invasion of Port Moresby.
Task Force MO was made up of five separate groups. The main Striking Force, commanded by Vice Admiral Takeo Takagi, was built around Carrier Division 5, under the command of Vice Admiral Chuichi Hara. This contained the two modern carriers Shokaku (Flying Heron) and Zuikaku (Joyous Heron), considered to have been the best designed Japanese aircraft carriers of the Second World War. The carriers were escorted by two heavy cruisers and six destroyers. The Covering Group, commanded by Rear-Admiral Nobuji Goto, contained the light carrier Shoho, four heavy cruisers and one destroyer.
The remaining three forces were all intended to establish new Japanese bases. The Tulagi Invasion Group was to set up a seaplane base on Tulagi, just to the north of Guadalcanal, in the Solomon Islands. The Support Group, built around a seaplane carrier, was to establish a base in the Louisiade Islands, to the south east of New Guinea. Finally the main Port Moresby Invasion Force, eleven transports and eight escorts under the command of Admiral Sadamachi Kajioka, was to sail from Rabaul, round the eastern tip of New Guinea, and land at Port Moresby.
The operation was to be commanded by Vice Admiral Shigeyoshi Inouye, commander of the Fourth Fleet based at Rabaul.
The Japanese plan for Operation MO revealed a weakness that would lead to far more serious Japanese defeats later in the war. Although the overall objective was simple – protect the invasion fleet heading for Port Moresby – the plan was far too complex, and relied on the coordination of five different task forces, most separated by large distances. The four main forces – Strike, Covering, Port Moresby and Support – all started the operation from different locations. The main Striking Force would come from the major Japanese naval base at Truk and sail around the eastern side of the Solomon Islands. The Covering Group would come from Bougainville, and sail south west towards the Jomard Passage. These two forces would enter the Coral Sea at opposite corners, in an attempt to catch the American fleet in a pincer. The Port Moresby Invasion fleet would leave Rabual and sail south to the Jomard Passage, then west to Port Moresby. Finally the Support Group would come from the New Guinea coast, sail east past the Jomard Passage, crossing the routes to be taken by the Port Moresby and Covering Groups. In the end this plan would leave the invasion fleets dangerously exposed, and deny the smaller Shoho the protection offered by the main carrier group.
The Allied fleet was built around two American carrier task forces. Task Force 17, under Rear Admiral Jack Fletcher, had been patrolling the south Pacific for two months. It was centred around the modern carrier USS Yorktown (CV-5), supported by the heavy cruisers Astoria, Chester and Portland, the destroyers Hammann, Anderson, Russell, Walke, Morris and Sims and the oil tanker Neosho (AO-23).
The only other carrier available was the older Lexington (CV-2), of Task Force 11 (Rear Admiral Aubrey Fitch). The Lexington was supported by the heavy cruisers Minneapolis and New Orleans, the destroyers Phelps, Dewey, Farragut, Aylwin and Monaghan and the oil tanker Tippecanoe (AO-21). Task Force 11 had just spent three weeks resting and resupplying at Pearl Harbor, before sailing south on 16 April.
The final part of Fletcher’s fleet was a mixed US-Australian group of cruisers and destroyers under the command of the Australian Rear Admiral John G. Crace. This force was made up of the heavy cruiser USS Chicago and the destroyer Perkins, which were based at Noumea, on New Caledonia, and the Australian cruisers Australia and Hobart, based at Sydney. On 5 May these ships became Task Force 17.3, but would later be better known as Task Force 44.
On 5 May Fletcher reorganised his fleet, giving Admiral Fitch command of both carriers (Task Force 17.5) and Admiral Thomas Kinkaid command of an attack group of five cruisers and five destroyers (Task Force 17.2).
The fleet also received a limited amount of support from PBY Catalinas based on New Caledonia and from heavy and medium bombers and reconnaissance aircraft of the USAAF and RAAF based on Australia. Unfortunately the Allied command structure in the Pacific meant that the Navy had no authority over the land based aircraft – Admiral Nimitz had command over all of the naval operations, but General MacArthur, the supreme Allied commander in the South West Pacific, retained command over all land-based Army and Air Force resources.
The American plan was very simple. By 17 April Admiral Nimitz had discovered that the Japanese were moving south, and correctly guessed that they were heading for Port Moresby. Admiral Jack Fletcher was given orders to attack enemy ships and planes, inflict as much damage as possible, and prevent the Japanese from seizing Port Moresby.
The first fleet to move was the Japanese striking force, which left Truk on 20 April. The American task force did not come together until 1 May, when Fletcher and Fitch’s forces met up east of Espiritu Santo. Once the combined task force was together, Fletcher ordered all of his ships to refuel. This was a dominant feature of Fletcher’s tactics, and as a result his own task force needed much less time to fill up its tanks than Fitch’s did. Fitch reported that his ships would not be refuelled until 4 May, and so Fletcher decided to split his fleet, taking the Yorktown west into the Coral Sea in case the Japanese arrived early. Fitch was to follow once he had refuelled, and the two fleets were to rendezvous at daylight on 4 May.
3 May
Early on 3 May the Japanese occupied Tulagi. This invasion was supported by the Covering Group, but at 11:00, after the occupation was complete, this force moved back to the west to cover the Port Moresby invasion. When Admiral Fletcher learnt of the invasion, he decided to head north towards Tulagi and use his aircraft to attack the Japanese invasion force. This should have been a very costly decision. The main Japanese Striking Force would pass close to the area, and could have been in place to provide cover, but on 3-4 May was still too far to the north to intervene. Even if the Covering Group had remained in place a little long then Fletcher might have lost vital aircraft in the attack.
4 May
On 4 May aircraft from the Yorktown made three attacks on the Japanese force at Tulagi. The first one sank the destroyer Kikuzuki and three minesweepers, the second destroyed two sea-planes and damaged a patrol craft and the third sank four landing barges. One torpedo bomber was lost during the attack, while two Wildcat fighters were forced to crash land on Guadalcanal having got lost. The American pilots reported sinking two destroyers and damaging a third, as well as sinking a freighter and four gunboats – over reporting would be a feature of the battle on both sides.
5 May
The main event on 5 May was the reunion of the two American carrier task forces 300 miles south of Guadalcanal. Once there Fletcher reorganised his fleet (see above). Fletcher then spent most of the day refuelling.
6 May
Very little took place on 6 May. The Japanese strike force rounded the eastern tip of the Solomon Islands, and entered the Coral Sea early in the day, and at one point came within seventy miles of the American carriers, but no long range scouts were launched, and so the chance of an early battle passed. Fletcher spent most of the day refuelling, before at 19:30 moving off to the north west in order to position for an attack on the Port Moresby invasion fleet on the following day.
7 May
7 May was the worst day for the Japanese. At 06:00 Admiral Takagi sent reconnaissance aircraft out to the south, and at 07:36 one of them discovered the oil tanker Neosho and the destroyer Sims, but misidentified them as an aircraft carrier and a cruiser. Hara responded by launched a full scale air attack against these two minor ships. The Sims survived attacks by groups of 15 and 10 level bombers, but was sunk by 36 dive bombers, while the Neosho was badly damaged by 20 dive bombers. Despite taking seven direct hits, she survived until 11 May, when 123 survivors were rescued. This attack prevented Hara from attacking Fletcher’s main carrier force during daylight on 7 May.
Fletcher was protected from ground based attack by what should have been a damaging mistake on his part. At 6:45 he decided to split his fleet, sending Crace’s support group north west to intercept the invasion fleet, while the main carrier force turned north. Crace never came anywhere near the invasion fleet, but Japanese land-based aircraft discovered his group, and spent most of the afternoon attacking without success. Crace was then attacked by a force of American aircraft (identified as either B-17s or B-26s in different sources). Despite these constant attacks, not one of his ships was hit.
This left Fletcher’s carrier group free to conduct operations without any interference. He too had launched scouts that morning, and at 8:15 one of them discovered part of the Japanese Support Group. Unfortunately the radio message was encoded incorrectly, and instead of reporting two heavy cruisers and two destroyers was read as reporting two carriers and four heavy cruisers. By the time the error was known, Fletcher had already launched an attack with 93 aircraft. The Americans were now to receive a massive stroke of luck. The leading aircraft in the strike force spotted the light carrier Shoho thirty five miles to the south east of their original targets. The entire attack was diverted to hit the Shoho, and between 11:00 and 11:25 she was hit by the attack groups from both American carriers. At 11:35, having been hit by at least seven torpedoes and eleven bombs, the Shoho sank (her sinking provoked the famous report “Scratch one flat-top”).
Takagi and Hara now knew the location of the American carriers, and decided to launch a daring night attack. At 16:30 the 27 pilots with the best records in night operations were sent west, with orders to find and attack the American carriers. This bold gamble was rewarded with near-total disaster. Poor visibility prevented the Japanese pilots from finding the Americans, but American radar guided their Grumman F4F Wildcats onto the Japanese bombers. Nine Japanese aircraft were shot down in these clashes. When the Japanese turned for home, their new course took them directly over the American carriers. Twice groups of three Japanese aircraft attempted to land on the American fighters with one being shot down. Finally eleven more aircraft crashed into the sea after running out of fuel. Twenty one of the twenty seven aircraft sent out were lost.
Most importantly for the result of the battle, at around midnight at the end of 7 May Admiral Inonue decided to postpone the invasion of Port Moresby for two days. Earlier in the day he had ordered the invasion fleet to reverse course while the battle was being fought, and now he had lost one carrier and the Americans appeared to be in a position to get between the main Japanese carrier force and the invasion fleet. In fact the Americans were already heading south, away from the danger zone. Even after the fighting on 8 May, by the end of which the Japanese believed they had sunk both Japanese carriers, Inonue did not feel confident enough to turn the invasion fleet back towards Port Moresby.
8 May
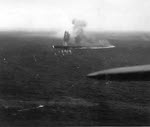
8 May saw the first direct carrier-vs-carrier battle of the Pacific War, fought between two unusually well balanced forces. The Americans were able to launch 121 aircraft, the Japanese 122. The Japanese had more experience and much better torpedoes, but the Americans had more bombers. The American attack began at 10:57, the Japanese at 11:18. Even when the fighting ended it looked as if the day would end in a draw. The two carrier forces were around 200 miles apart, with the Japanese to the north east of the Americans. Both the Japanese and Americans launched their scouts early on 8 May and both quickly found their opponents.
The American attack force consisted of 24 bombers, 9 torpedo bombers and 6 fighters from the Yorktown and 22 dive-bombers, 11 torpedo bombers and 4 reconnaissance bombers from the Lexington. The first of these aircraft, the dive-bombers from the Yorktown, found the Japanese ships at 10:30, and began their attack at 10:57. By then Zuikaku was hidden in clouds, and so the full weight of the American attack fell on the Shokaku (minus the 22 dive bombers from the Lexington who failed to find their target). The result of this attack was somewhat disappointing. None of the slow American torpedoes inflicted any damage. Three bombs hit, the first well forward on the flight deck, another in a repair compartment. The Shokaku was set on fire, but could still recover aircraft. 108 of the crew were killed, but the fires were soon put out, many of the aircraft transferred to the Zuikaku, and at 13:00 the Shokaku was ordered to return to Truk for repairs.
The Japanese attack force contained 18 torpedo-bombers, 33 bombers and 18 fighters. Although they were detected on radar, there were not enough fighters available to effectively intercept the Japanese attack, and at 11:18 the two American carriers came under attack. The more modern Yorktown avoided every torpedo, and only suffered one hit from a bomb, but the Lexington was not as lucky. At 11:20 she was hit by one torpedo on the port side, followed by a second hit opposite the bridge, as well as suffering two hits from small bombs. The Japanese aircraft were gone by 11:39, and the battle of the Coral Sea was effectively over.
The biggest American lose was yet to come. For an hour after the battle ended the Lexington appeared to have survived. The fires were put out, the torpedo damage had been temporarily repaired, and the ship was about to be put back on an even keel, but during this time aviation fuel fumes had been leaking into a compartment that contained a running generator. At 12:47 a spark caused a massive explosion, the first of a series of explosions that soon developed into massive fires. Even then the Lexington did not have to be abandoned until 17:10, and she remained afloat until 20:00 when she was sunk by five torpedoes from the destroyer Phelps.
Both sides over-reported their successes. The Americans believed that the Shokaku was worse damaged than she was, while the Japanese reported having sunk both American carriers. The over-reporting would be far more damaging to the Japanese. Believing the threat from the American carriers to be gone, Admiral Inonue ordered the Japanese striking force to return to Truk. He also decided to postpone the invasion of Port Moresby, possibly because with only one of his original three carriers still operational he did not believe that the invasion force could be protected from land based aircraft. At midnight on 8 May Admiral Yamamoto ordered the strike force to turn south to find and destroy any American survivors, but by then it was too late – after the loss of the LexingtonFletcher had been ordered to sail south to save the Yorktown, and the American fleet was out of reach of the Zuikaku.
The battle of the Coral Sea is normally described as a Japanese tactical victory but an American strategic victory, because although the Americans suffered the heavier losses, the Japanese failed in their objectives. By the end of the battle the Japanese had lost one small carrier, one destroyer, a number of smaller craft and at least 64 aircraft (21 in the night attack on 7 May, 43 on 8 May). The Americans had lost the Lexington, one destroyer and one oil tanker, and 33 aircraft on 8 May. What is true is that the Americans lost more tons of shipping than the Japanese, although this is a little misleading. The Lexington may have been four times larger than the Shoho, but she only carried twice the number of aircraft.
In terms of major carrier strength in the Pacific the critical moment would come only one month later, at Midway. Here the results of the battle of the Coral Sea are much more clearly in favour of the Americans – the Yorktown played an important part in that battle, while neither the Shokaku nor Zuikaku took any part in the fighting – the Shokaku because of the damage taken during the battle, and the Zuikaku because of the losses suffered by her air groups. Not only had the Japanese lost more aircraft during the main carrier battle on 8 May, they would also prove to be far less able than the Americans to replace their losses.
The most important result of the battle was the failure of the Japanese amphibious attack on Port Moresby. The Japanese high command was still convinced that Port Moresby was an important target, and decided to launch an overland invasion across the Kokoda Trail. This campaign would end in the first clear Japanese defeat of the war on land, and would mark the point at which the Japanese were forced onto the defensive in the south western Pacific.
 The Coral Sea 1942: The First Carrier Battle, Mark Stille, Campaign 214. A useful account of the battle of the Coral Sea and the thinking and events that led up to it, supported by some effective '3D' diagrams showing the series of aerial attacks on enemy carriers that were the most important aspect of the fighting. [read full review]