|
|
|
|
The naval battle of Guadalcanal (13-15 November 1942) was a series of connected engagements that saw the defeat of the last major Japanese attempt to bring reinforcements to Guadalcanal and was the most important of the six naval battles that were fought around Guadalcanal. It also saw the first direct clash between American and Japanese battleships during the Pacific War and the first Japanese battleship losses of the war.
After the original American invasion of Guadalcanal the Japanese had launched a series of small scale counterattacks, each of which had failed. In October they finally committed a full division to a fresh attack, supported by a powerful naval force that included four aircraft carriers. The ground attack was fought off by the American troops on Guadalcanal, while two of the carriers were damaged and 100 naval aircraft lost during the battle of the Santa Cruz Islands (26 October 1942).
The Japanese Plan
On 26 October, just as the last desperate assaults of the October counterattack were failing, Captain Toshikazu Ohmea, Chief of Staff of the Southeastern Fleet, visited General Hyakutake on Guadalcanal. His aim was to force Hyakutake to chose between Guadalcanal and Port Moresby and come up with a plan for a new offensive against whichever target was picked.
Admiral Yamamoto had already come up with a plan. He believed that the October offensives had failed because the Navy had been forced to wait for the Army to act. When the Army delayed its attacks the Navy came under attack, and during the battle of the Santa Cruz Islands (26 October) two carriers were badly damaged and 100 aircraft lost. At least for the moment the Navy wasn't willing to risk its remaining carriers off Guadalcanal.
Yamamoto wanted to move the 38th Division from Rabaul and the Shortland Islands to Guadalcanal, and land them at Koli Point, east of the American beachhead, where they would be able to join up some isolated Japanese survivors of a previous attack. The Navy's battleships would bombard Henderson Field, while the Army would attack from east and west. The Americans would be isolated and soon be forced to surrender.
This plan wasn't universally supported even within the Navy. Admiral Tanaka, the successful commander of the 'Tokyo Express' believed that Guadalcanal should be abandoned and the Japanese concentrate on the defences of Rabaul. The idea of a two pronged assault was abandoned in early November, in favour of a bigger build-up to the west of the American beachhead. Admiral Tanaka was given the task of moving reinforcements onto Guadalcanal, and on 7-8 and 10-11 November he successfully transported the first two waves of fresh troops from Rabaul and the Shortland Islands.
Navy provides four task forces - two bombardment forces to attack Henderson, one transport division and one support force from the Combined Fleet
By 12 Nov Allied recon has spotted two aircraft carriers, four battleships, five heavy cruisers, thirty destroyers in southern Bougainville anchorages, but the carriers don't get involved
American Plans
The Americans were also building up their forces on Guadalcanal. Admiral Turner was given the task of transporting the 182nd Regimental Combat Team (minus its 3rd Battalion) from Noumea to Guadalcanal. He had overall command of three naval forces that would come together as they steamed towards Guadalcanal.
Admiral Turner was in personal command of a fleet of four transport ships, carrying the 182nd Infantry, which departed from Noumea on 8 November.
Admiral Scott had command of another transport force, carrying supplies to Guadalcanal. This fleet left Espiritu Santo on 9 November.
Finally Admiral Callaghan commanded the close-in escort for the two transport ships. He had five cruisers and ten destroyers, and left Espiritu Santo on 10 November.
Cover for this operation was to be provided by Admiral Kinkaid, who had the carrier Enterprise (still undergoing repairs after the battle of the Santa Cruz Islands), two battleships (Washington and South Dakota) and a force of cruisers and destroyers. The Enterprise was the only operational American carrier left in the South Pacific, so Halsey couldn’t take too many risks with her.
Build-up to Battle
On 11 November Callaghan and Turner rendezvoused off San Cristobal (south-east of Guadalcanal). At 5.30am on the same day Scott's transport ships arrived at Guadalcanal and began to unload. The transport ships were attacked twice by Japanese aircraft, and the Zeilin, Libra and Betelgeuse were all hit. At 6pm the transport ships withdrew east to Indispensable Strait. The Zeilin was found to be badly damaged was sent back to Espiritu Santo, with a destroyer escort. Libra and Betelgeuse then joined Admiral Turner's transport group while Scott's remaining warships joined Callaghan. The combined fleet then spent the night of 11-12 November patrolled the area north of the beachhead.
Turner's transports arrived off Lunga Point on Guadalcanal at 5.30am on 12 November and began to unload. They came under fire from Japanese shore guns, which opened fire at Betelgeuse and Libra at 7.18am. One cruiser, two destroyers and land-based artillery silenced the Japanese guns.
In the afternoon a force of 25 to 31 torpedo bombers attacked the transports, causing a two hour delay in unloading. Admiral Callaghan's flagship San Francisco and the destroyer Buchanan were damaged in this attack, and all but one of the Japanese aircraft were shot down.
By 18.15 all of the men had been unloaded, along with most of the cargo, but it was clear that several days would be needed to unload the Libra and Betelgeuse. The Japanese bombardment force had been sighted by American aircraft at 10.28am and Callaghan decided to withdraw the transports to avoid any risk of them being caught by the Japanese battleships. His warships escorted the transports as far as Indispensible Strait, and then turned back to attack the incoming Japanese.
The Americans had detected one of the Japanese bombardment forces, made up of the battleships Hiei and Kirishima, the light cruiser Nagara and fifteen destroyers. Admiral Tanaka, with the transport fleet, was some way further to the west, having only left the Shortland Islands late on 12 November,
Night of 12-13 November
The first phase of the naval battle of Guadalcanal took place on the night of 12-13 November 1943, when Callaghan's force of cruisers and destroyers attempted to intercept the incoming Japanese bombardment force.
At first appearance Callaghan was very badly outgunned. He had the 8-in heavy cruisers San Francisco and Portland, the 6-in light cruiser Helana and the 5-in anti-aircraft cruisers Juneau and Atlanta, as well as eight destroyers. The Helena carried modern radar, but Callaghan's flagship Callaghan didn't.
The Japanese had the battleships Hiei and Kirishima, each with eight 14-in guns, the light cruiser Nagara and fourteen destroyers. The Japanese had also proved to be better at night-time battles, despite their lack of radar.
Their only weakness was that the battleships were armed with high explosive shells, ready for the bombardment of Henderson Field, rather than with armour piercing shells. On the American side a lack of confidence in their ability to manoeuvre at night meant that they entered battle in a single long line.
At 1.24am on 13 November 1942 the Japanese formation appeared on the Helena's radar at 27,000 yards. Admiral Abe had deployed in an arrow formation. The cruiser Nagara was in the lead, followed by the Hiei and then the Kirishima. He had wanted to have two lines of destroyers on the flanks, but the three destroyers from the right-hand side of the front line had fallen back, so there were two destroyers to the left of the Nagara then three destroyers on each side of the line just ahead of the Hiei. The remaining destroyers had been detached and were patrolling to the west of Guadalcanal.
For the next seventeen minutes the Americans had the advantage of surprise, but Callaghan failed to take advantage of it. His own radar didn't show the Japanese ships, and the two fleets closed to within 2,500 yards of each other. At this point the leading American Cushing and the leading Japanese destroyers Yudachi and Marusami came into sight of each other. The Cushing turned sharply to avoid a collision, and part of the American line followed. At 1.45 Callaghan issued the order to stand by to open fire, but the Japanese moved first.
At 1.48am, with the American fleet almost in amongst the Japanese formation, the Japanese fired star shells, illuminated their targets and then opened fire with guns and long lance torpedoes. A confused melee quickly developed, with American guns focusing as much as possible on the battleship Hiei while the Japanese commanders were able to use their experience and initiative to inflict heavy losses.
The long lance torpedoes accounted for the cruiser Atlanta, which was badly damaged and had to be scuttled after the battle, and the destroyers Cushing and Laffey. Admiral Scott was killed by gunfire that hit the Atlanta.
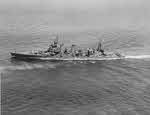
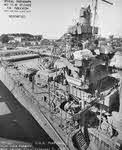
The San Francisco was hit by fifteen large shells, including a number from the Kirishima. The bridge was destroyed and Admiral Callaghan and his staff were killed. By the end of the fighting the San Francisco's superstructure had been wrecked, although she was intact below that level and still capable moving under her own steam.
The Portland and the Juneau were both hit by later salvoes of torpedoes. The Portland survived to be towed to safety at Tulagi, but the Juneau was sunk by a Japanese submarine as the fleet withdrew after the battle.
The destroyer Barton was hit by two torpedoes and sank quickly. The destroyer Monssen caught fire and had to be abandoned. She exploded at around noon.
When the American ships did open fire they were able to inflict some significant damage on the Japanese ships. The destroyer Akatsuki was sunk, the Yudachi was badly damaged and the battleship Hiei was hit by around 80 shells.
Although the Japanese had dominated the fighting, at 3am the Kirishima, the Nagara and the remaining destroyers turned and withdrew to the north without carrying out the planned bombardment.
At this stage the fighting appeared to have gone very badly for the Americans. Two cruisers and four destroyers and been lost. The San Francisco and Portlandwere both heavily damaged, as were the destroyers Aaron Ward, O'Bannon and Sterrett. Of the original force of five cruisers and eight destroyers only the cruiser Helena and the destroyers O'Bannon and Fletcher had avoided heavy damage or destruction.
13 November
The balance was somewhat restored after daylight on 13 November. At dawn the Hiei was found heavily damaged and circling near Savo Island. All day American aircraft attacked her, although she was still afloat at the end of the day. The damage was now irretrievable and on 14 November she was scuttled by her crew, becoming the first battleship to be lost by the Japanese during the Second World War.
During 13 November both sides moved their fleets around. Admiral Tanaka began a second attempt to get his transport ships to Guadalcanal, leaving the Shortland Islands during the afternoon.
On the American side Admiral Halsey ordered Kinkaid to move the Enterprise south with the survivors of Callaghan's mauled fleet, while Admiral Willis E. Lee, with the battleships Washington and South Dakota and four destroyers were sent towards Guadalcanal. They wouldn't arrive until late on 14 November, so on the night of 13-14 November the American beachhead was left vulnerable from the sea.
The Japanese were able to take advantage of that vulnerability. Their second bombardment force, made up of three heavy cruisers, two light cruisers and four destroyers from the Outer South Seas Supporting Unit of the 8th Fleet, arrived off Henderson Field just after midnight on 13-14 November and fired 1,000 shells towards Henderson Field. The bombardment did little damage, and the Japanese ships withdrew after half an hour.
At dawn there were two Japanese naval forces close to Guadalcanal. Admiral Tanaka's eleven transport ships and twelve destroyers were around 150 miles up The Slot, while the bombardment force was retiring to the north.
The first American target was the bombardment fleet. Aircraft from Guadalcanal were first to attack, damaging the heavy cruiser Kinugasa and the light cruiser Isuzu. The attack was continued by aircraft from the Enterprise, which damaged both of those cruises as well as the heavy cruisers Chokai and Maya. Some of the aircraft from the Enterprise then returned to Henderson Field, where they operated on detachment. The Kinugasa was fatally damaged and later sank.
The more important target was the troop convoy. This had been found at 8.30am by aircraft from the Southwest Pacific area, temporarily helping out in the South Pacific. The eleven transport ships carried 10,000 troops from the 229th and 230th regiments of the 38th Division along with some supporting troops.
The first attack, early in the morning, did little damage. The second wave, which attacked from Henderson Field, struck at 11.50 and damaged several of the transport ships. The third major attack, just before 1pm, sank the first one. At 2.30pm B-17s from Espiritu Santo joined in, and scored a number of hits. By the end of the day seven of the transport ships had been sunk. Of the 6,000 men on these ships around 5,000 were rescued by Tanaka's destroyers.
The surviving four transport ships sailed on towards Guadalcanal, arriving under cover of darkness.
Night of 14-15 November
By the evening of 14 November Tanaka had four transport ships and four destroyers left from his original fleet. The Japanese had now detected Admiral Lee's battleships approaching from the south, but they didn't identify the battleships and believed it to consist of four cruisers and four destroyers. Admiral Tanaka was ordered to continue on towards Guadalcanal, while Admiral Kondo was ordered to bring the survivors of his bombardment force back to Guadalcanal to cover them. Kondo had the undamaged battleship Kirishima, the heavy cruisers Atoga and Takao, the light cruisers Sendai and Nagara and nine destroyers.
This Japanese decision brought on the first direct clash between battleships in the Pacific.
On the evening of 14 November Lee's task force sailed east, passing to the north of Savo Island. At 22.49 Lee turned south-east, to pass between Savo and Florida Islands Finally at 23.52 he turned west, to head between Savo Island and Guadalcanal. His task force was thus sailing west when the battle began, and was south-east of Savo Island.
The Japanese were advancing from the north, in three groups. The cruiser Sendai and three destroyers were in the lead. Next were the cruiser Nagara and six destroyers, acting as a close screen for the final group, the battleship Kirishima and the cruisers Atago and Takao.
The Japanese were first to spot their opponents. The American fleet was sighted from the Sendai, and the leading group split, with two destroyers passing west of Savo Island and the Sendai and the third destroyer passing to the east. Admiral Kondo ordered Nagara and four destroyers to follow the two west of Savo, while he followed behind with the heavier ships.
At midnight on 14-15 November Lee received a report from a PT boat that had just spotted three ships heading west around the northern end of Savo Island. These were the two destroyers from the Japanese advance group. At 00.06am the first Japanese ships showed up on the Washington's radar - the Sendai and her escorting destroyer. At 0.16am the Washington opened fire on the Sendai and after a short bombardment the Japanese cruiser retired.
At about the same time the South Dakota and some of the destroyers opened fire on the Japanese destroyers west of Savo Island. This first phase of the battle involved the leading US destroyers (Walke, Benham, Preston and Gwin) and the two battleships, against the cruisers Sendai and Nagara and their escorting destroyers. The Japanese had much the better of this early engagement and by 0.30 all four American destroyers had been hit. The Walke was on fire and sank soon after 0.40am. The Preston was also on fire, and although she survived the main battle she was later abandoned and sank. The Benham and the Gwin had both suffered damage that forced them out of the battle. Gwin survived, but the Benham was lost on her way back to safety.
The battle now moved into a second phase, in the waters south-west of Savo Island. The Japanese cruisers had retired after their early successes and reported the presence of American battleships. As the South Dakota and Washington sailed west past Savo Island, Admiral Kondo emerged from the cover of the island with the destroyers Asagumo and Teruzuki in the lead, the heavy cruisers Atago and Takao and the battleship Kirishima in the rear.
Just at this moment the South Dakota was suffering from a power failure that had knocked out her radar. She turned to starboard to avoid the damaged destroyers, a move that brought her within 5,000 yards of the Japanese heavy ships. They opened fire at short range, and began to hit the vulnerable battleship.
At 1.00 the Washington opened fire on the Kirishima at the start of a seven minute radar-guided attack that was the first battleship-to-battleship clash of the Pacific War. The Washington fired seventy five 16in and one hundred and seven 5in shells in this short duel, and scored at least nine hits with the 16in guns and forty with the 5in guns. The Kirishima was fatally damaged.
At this point Admiral Kondo still had two heavy cruisers, two light cruisers and eight destroyers. On the American side all four destroyers were out of action, the South Dakota was ineffective and only the Washington was still fully in the battle. Kondo might have been able to inflict a serious defeat on the Americans, but he didn't have radar and thus couldn't be sure that there weren't more American ships somewhere in the dark. Accordingly he left the Sendai and four destroyers to rescue the crews of the Kirishima and the badly damaged destroyer Ayanami, and retired to the north. Both of the damaged ships were scuttled.
The night battle of 14-15 November ended as a costly American victory. For the loss of three destroyers and serious damage to the South Dakota they had won the first battleship duel of the Pacific War and sunk the Kirishima and a destroyer. They had also prevented a bombardment of Henderson Field, and maintained control of the seas north of Guadalcanal.
The benefits of this would become apparent at dawn. Tanaka had managed to get his four transports to Guadalcanal, and ordered them to run aground at Tassafaronga. Tanaka then escaped with his remaining four destroyers.
Dawn found the transports exposed to American attack. This began at 5am when F Battery, 244th Coastal Artillery Battalion opened fire. At 5.45 the 5in guns of the 3rd Defence Battalion joined in, and the destroyer Meade came over from Tulagi to help. By noon all four of the Japanese transport ships had been destroyers along with an uncertain amount of the supplies. Somewhere between 2,000 and 4,000 reinforcements had also been landed.
Conclusion
The naval battle of Guadalcanal ended the final attempts of the Tokyo Express to bring reinforcements to Guadalcanal. The Japanese had lost two battleships, a heavy cruiser, three destroyers and eleven transports in the various battles. The American had lost three cruisers and seven destroyers and another seven warships had been damaged, but the Americans could replace their ships and the Japanese could not. Control of the seas around Guadalcanal had passed to the Americans who were able to reinforce the island more easily than before.
There would be one more naval clash off Guadalcanal, the battle of Tassafaronga (30 November 1942), but although this ended as a notable Japanese victory, it came during a supply run rather than an attempt to reinforce the island, and the Japanese soon began to think about evacuating Guadalcanal.
 Japanese Combined Fleet – 1942-43, Guadalcanal to the Solomons Campaign, Mark Stille.
Looks at perhaps the most intensive period of surface naval warfare of the Second World War, the prolonged series of battles around Guadalcanal and in the Solomon Islands, which saw the Japanese win many of the night battles, taking advantage of their excellent torpedoes, but suffer heavy losses that eventually forced them to withdraw from Guadalcanal and degraded their abilities for the rest of the war (Read Full Review)
Japanese Combined Fleet – 1942-43, Guadalcanal to the Solomons Campaign, Mark Stille.
Looks at perhaps the most intensive period of surface naval warfare of the Second World War, the prolonged series of battles around Guadalcanal and in the Solomon Islands, which saw the Japanese win many of the night battles, taking advantage of their excellent torpedoes, but suffer heavy losses that eventually forced them to withdraw from Guadalcanal and degraded their abilities for the rest of the war (Read Full Review)