New Guinea during
the Second World War
|
|
The battle of Wewak (December 1944-September 1945) was an Australian offensive on New Guinea, aimed at destroying the last major Japanese position in the pre-war area of Australian New Guinea, on the north coast around Wewak. It was a controversial operation that didn’t appear to have much significance for the wider war, but in ten months the Australians did manage to drive the last remnants of General Hotazo Adachi's Eighteenth Army away from their last coastal positions and into the mountains.
Adachi's army had once been at the forefront of the Japanese effort in eastern New Guinea, but during 1943 it had been pushed out of the Huon Gulf and defeated on the Huon Peninsula and in the Finisterre Mountains. Adachi had been forced to abandon his headquarters at Madang and retreated further west to Wewak, where the next American attack was expected. Instead they bypassed Wewak and attacked Hollandia and Aitape on 22 April 1944. The Japanese were caught out and both places fell easily. General Adachi made one attempt to restore the situation, or at least regain some pride, and launched an attack on the Americans positions on the Driniumor River east of Aitape (10 July -25 August 1944), but after some initial successes this attack was repulsed.
General Adachi was now trapped in a narrow area around his bases at Wewak in the west and Hansa Bay in the east. At first he had the Australians to his east and the Americans to his west, and the bigger threat came from the Australians. After the fall of Madang and Alexishafen in late April the Australians had paused, but in May they began to advance around the coast towards Hansa Bay. This brought them past a series of areas that reflected the former German occupation of the area, including Kronprinz Harbour and Potsdam. They reached Hansa Bay on 14 June, and discovered that the Japanese had pulled out a few weeks earlier as Adachi's attention was pulled west toward Hollandia and Aitape.
After the failure of the Driniumor offensive the Japanese retreated to the area around Wewak. This was half way between the allied coastal positions at Aitape and Hansa Bay. Most of the surviving Japanese were based on the coastal plain, a narrow band of often swampy ground that ran east from Aitape to the wide Sepik River. Inland from the coast was a band of mountains, with the Torricelli Range in the west and the Prince Alexander Range in the east (south of Wewak). On the southern side of these mountains was the Sepik River, which flows east into the sea between Wewak and Hansa Bay. The northern side of the mountains were largely uninhabited, the southern slopes were more populous.
The Japanese had around 35,000 men in the area, largely made up of the remnants of three divisions. The 51st Division was posted to the east, with its HQ at Wewak and control of the coast from the Sepik River west past Wewak to Karawop. The 20th Division defended the western section of the coast, west from Karawop and including airfields at But and Dagua on the coast. Their HQ was at But, towards the western end of their sector. The 41st Division was based to the south-west of the 20th, with its HQ at Balif on the southern side of the mountains, but also covering the area north to the coast. This was the remains of General Adachi's once-powerful Eighteenth Army.
The Japanese were faced by the Australian 6th Division (General Jack Stevens), which began to replace the Americans at Aitape in September 1944. By 31 December three full brigades, the 19th, 17th and 16th Brigades, had arrived at Aitape. The Americans had been happy to leave the Japanese at Wewak alone now that they didn't appear to pose any threat, but the Australians decided on a more aggressive approach. General Stevens was ordered to gather intelligence, defend the airfield and radar bases at Aitape, to prevent the Japanese forces from moving westward and to take any opportunity to destroy those forces.
The first Australian unit to enter combat around Aitape was the 2/6th Cavalry (Commando) Regiment, which arrived ahead of the main force. The unit replaced the American garrison of Babiang, the easternmost point in their Aitape perimeter, about two thirds of the way between Aitape and the westernmost Japanese positions. Towards the end of October the 2/6th began to conduct patrols in an attempt to expand their limited knowledge of the Japanese positions. Some patrols headed south across the mountains, while others went east, along the Old German Road. These patrols often surprised isolated groups of Japanese troops, many of whom were clearly not expected any Allied movements.
The Australians took formal control at Aitape on 26 November. General Stevens decided to carry out two operations to the east of the main perimeter, one to cut Japanese communications south across the mountains and the second to push them off the east bank of the Danmap River. On 17 December the 2/4th Battalion crossed the Danmap at the start of this offensive, and soon reached their first target at Rocky Point. The Japanese put up heavy resistance as the Australians advanced along the coast, but they were unable to stop the Australians. In this area the Danmap flowed north to Malin, then west before turning north again to reach the coast. The Australians had advanced along the coast until they were level with Malin, On 8 January 1945 the 2/8th Battalion captured Malin, securing the area east of the coastal loop in the Danmap. Heavy rain then delayed any further offensive, and a few weeks were spent patrolling. At the same time the Australians were also campaigning in the mountains, where they kept pushing the Japanese back.
General Stevens now put forward three suggestions for campaigns for 1945. His preference was for an advance along the Torricelli Range, to prevent the Japanese retreating south from Wewak into the more fertile areas where they had established gardens, but the resources weren't available. This would have needed extra air support, which couldn't be provided. Instead, on 10 February, he was ordered to continue to advance along the coast to Wewak, within its own resources and without becoming engaged in any major battles.
The next step was to push forward to the Anumb River. The advance would be supported by landing craft that were used to bring supplies forward from Aitape, a much quicker method than dragging them overland. This advance was opposed by around 770 Japanese troops, mainly from the 237th Regiment. The attack was to be carried out by the 2/1st Battalion. The new battalion didn't see any Japanese troops until 29th January, but they were then the target of a Japanese counterattack launched by a fresh Japanese battalion sent from Wewak. The first Japanese attack, on 29-30 January, was followed by three weeks of Australian pressure before the Japanese were forced back. The Japanese saw this battle as a major defeat and ordered their westernmost troops to fall back on the 20th Division. February also saw the Australians advancing further inland. One problem they encountered here was the Japanese tendency to retreat south instead of east, so in March a force was sent on a sweep around the Japanese left flank in an attempt to push them back towards the main force. This force encountered determined Japanese opposition and didn't clear its area until the end of the month.
The Japanese were now being pushed out of important areas. In the mountains the 41st Division's HQ at Balif had to be abandoned. On the coast the Australians captured the 20th Division's original HQ at But in mid March. Dagua was taken a few days later, and the airfield was found to have been long abandoned. The Japanese had been forced south away from the coast, and now had to be cleared out of the mountain foothills. This triggered the hardest fighting since the start of the Australian offensive, and it took most of April to secure the area. This hard fighting began to reduce the morale of the 6th Division, especially as it all seemed rather pointless with the main focus of the war now so much closer to Japan. Possibly in response to this the division was finally given more naval support, including transport and warships.
The next Australian target was Maprik, east of Balif in the mountains. This attack was to be carried out by the 2/7th Battalion. The Maprik area was reached in mid-April, but once again the Japanese put up stiff resistance and it took several days to clear the area. The Australians continued to advance along the inland route throughout May, steadily pushing the Japanese back.
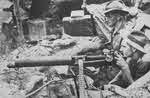
On the coast the Australians began the final attack towards Wewak, using But as their main base. This fighting was supported by tanks, and the Australians were able to make good progress. The Australians were now advancing through the wreckage of a major Japanese base area, a sign of the parlous state of Adachi's army.
The attack on Wewak was to be a two pronged assault with an amphibious aspect. The 19th Brigade was to begin an attack from the west on 3 May, with an amphibious force landing east of Wewak on 11 May. The western attack went very well. There was little resistance between 3-6 May and the Japanese encountered on the night of 6-7 May soon withdrew. By 7 May the advancing troops were on the western edge of Wewak and it was clear that the Japanese had abandoned any hope of holding on. Instead they were retreated south across the mountains, just as General Stevens had feared. Wewak fell on 10 May, but the main action was now inland where Australian forces were attempting to prevent the Japanese from escaping south. In the meantime the amphibious force landed as planned, but the Japanese weren't attempting to escape east, and so the affair was something of an anti-climax.
The last period of the campaign focused on pushing the Japanese away from their strongholds in the mountains and their food producing gardens on the southern slopes. The Australians finally had better artillery support, although they did suffer from a relative shortage of bombs for their air support. The Japanese position now stretched from the vicinity of Yamil in the west to the mountains south of Wewak in the east. They had built strong defences in these areas, and were fighting to defend their food.
The Australians began to press into this area at the start of June. This marked the start of a period of hard fighting in which the Japanese were generally unable to hold onto any particular position for any period of time, but elsewhere the war was drawing rapidly towards its end. The Australians were able to push the Japanese out of the Yamil positions in the west. Troops pushing inland from Wewak captured the Japanese strongholds at Mt Shiburangu and Mt Tazaki, and continued to push south to Mt Shoto. Towards the end of the war these troops turned west to advance towards their colleagues coming from that direction.
By early August the Japanese had been pushed back into a small area south of the mountains, running from Haripmor in the west to Sassuia in the north and Tonumbu in the east. The remains of the 51st Division were on the right, facing east. The 20th was in the centre, facing north and the 41st was on the left, facing west. More of Adachi's men had been sent south into the Sepik Valley to find food. Adachi hoped to conduct a last-ditch defence that would last at least into September. However the Japanese surrender in mid-August ended the fighting at Wewak while the Japanese still held onto their last positions,
When the fighting ended the 20th Division had 255 officers and 1,456 men, the 41st had 158 officers and 989 men and the 51st had around 6,000 men. Other units made up around 5,000 men. The Eighteenth Army had suffered massive losses on New Guinea, and only 13,500 men surrendered from an original total of around 100,000.
Although the Japanese had offered some determined resistance, Australian casualties were surprisingly low. The 6th Division lost 442 dead and 1,141 wounded in ten months. The Japanese lost around 9,000 dead in combat and an unknown amount to illness.