|
|
|
|
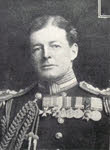
David Beatty was one of the most senior British admirals during the First World War, winning fame as the commander of the battlecruiser squadron from 1913 to 1916, before serving as commander in chief of the Grand Fleet and First Sea Lord. He was a member of an army family – his father and three brothers all joined the army, with roots in Wexford. The family had connections with horses and the hunt, and Beatty would remain a keen horseman throughout his life.
After a childhood interest in the sea, Beatty entered the navy in 1884, at the then standard age of 13, spending two years at the Royal Naval College, Dartmouth. He finished 18th of the 33 in his class, having not got on with the strict routine at the college, and was given a posting to the China station. At this point his mother intervened, and used her influence to get him transferred to HMS Alexandra, flagship of Prince Alfred, Duke of Edinburgh, the command-in-chief of the Mediterranean Fleet. Prince Alfred was the second son of Queen Victoria, and a good professional sailor. Beatty’s time on the Alexandria was of great importance to his career – he met a number of important people visiting Prince Alfred, and impressed many of them with his “Horsey” background and general character.
One feature of the First World War is that the senior officers of 1914-1918, leading a steel, steam powered navy, had grown up in a very different fleet. Even Beatty, one of the youngest senior officers of 1914, shared this experience – Alexandria was a fully rigged sailing ship, armed with muzzle loading guns, although she was also powered by steam and carried torpedoes.
On 14 May 1890, Beatty was promoted to sub-lieutenant, spending most of his time in that rank at Greenwich and Portsmouth, gaining first class certificates in torpedo and second class certificates in seamanship, gunnery and pilotage. Rapid promotion was clearly not going to come via academic ability.
In 1892 he was promoted to Lieutenant. His first cruise was on the training corvette Ruby, followed by periods on the battleships Camperdown (1893-1895) and Trafalgar (1895-1896). This period gave him his first experience of the problems and opportunities of the steam powered navy, and also brought him to the attention of Stanley Colville.
In 1896, Lord Kitchener wanted a force of gunboats to accompany his Sudan expedition. Colville was chosen to command the expedition, and picked Beatty as his second in command. This was his great chance, and he took it brilliantly. Only three of Colville’s boats passed through the Third Cataract. Soon afterwards, they came under artillery fire, and Colville was badly wounded. The young Beatty found himself in command. He decided to take the risk of running past the Dervish guns, placing his ships under fire as they moved against the stream. The risky maneuver came off, and Beatty’s small fleet occupied the town of Dongola. He was rewarded with the D.S.O.
Beatty was also present during the 1897-1898 campaign, commanding a rocket battery at the battle of Atbara (8 April 1898). Lord Kitchener praised him in his 1898 dispatch, and on 15 November 1898 Beatty was leapfrogged ahead of 395 more senior lieutenants and promoted to commander.
In April 1899 Colville was captain of the battleship HMS Barfleur, the flagship of the second-in-command Admiral on the China station. He requested Commander Beatty as his executive officer, putting him in the right place to earn more promotion during the Boxer Rebellions. He took part in the land operations around Tientsin (Tianjin), first as part of the naval force that reinforced the besieged foreign settlement, and then during sorties from the forts. During this campaign he received serious wounds that would keep him away from active service until the middle of 1902, but he also gained a special promotion to the rank of captain, aged only 29. At this time the average age of a new captain was 43. If all went well, this would mean that Beatty could become an admiral while still in his 30s.
Beatty’s wounds kept him ashore during 1901 and the first half of 1902. During this period he married Ethel Field, the daughter of a Chicago millionaire.
His first command came on 2 June 1902, when he was appointed captain of the cruiser HMS Juno, part of the elite Mediterranean Fleet. This had been Admiral Fisher’s fleet, and was perhaps the best trained in the navy. Fisher had implemented a series of tough fleet manoeuvres, which continued after he left. Beatty was not entirely impressed with these exercises, finding them unrealistic and repetitive, and would criticize them for failing to take into account modern changes to naval warfare, amongst them the submarine and the minefield.
The Victorian navy had been understandably obsessed with Nelson. In most cases that became an obsession with his willingness to attack at all costs, but Beatty clearly noticed other aspects of Nelson’s career. One of the key reasons for Nelson’s success was that he spent the endless months at sea discussing possible battle scenarios with his captains, until they all knew exactly what to do in any situation. This was seen to its best at the battle of the Nile, where Nelson’s captains were willing to risk passing between the French fleet and the Egyptian coast, secure in the knowledge that Nelson would approve. While serving in the Mediterranean Beatty began to follow the same plan, discussing the results of the naval manoeuvres with his own officers. He would repeat this with his battlecruiser captains and then with the captains of the Grand Fleet, perhaps not always with the level of success he would have wanted.
His final command in the Mediterranean fleet was the new cruiser HMS Suffolk, which he commanded from October 1904-September 1905. Once back in England, he was appointed naval adviser to the Army Council. This was a difficult post, as Lord Fisher refused to discuss the navy’s plans with the army, but Beatty did get to take part in the planning for the movement of the British Army to France. Later in his career Beatty became an active supporter of inter-service planning.
Two things stood in the way of Beatty reaching the rank of rear-admiral before turning 40. The first was that he would not have had enough time in command at sea – his injuries in 1900-1901 and the time on the Army Council meant that he did not have the six years at sea needed for promotion. Second, he had not yet commanded a battleship. This was easily fixed with an appointment to command HMS Queen, one of the last pre-dreadnaught battleships, and part of the Atlantic Fleet. His commander was Prince Louis of Battenberg, later to be First Sea Lord. Beatty was impressed with Prince Louis and the nature of his exercises. He also generally approved on Lord Fisher, if not of some of his methods.
On 1 January 1910, Beatty was promoted to rear-admiral by order of council. He was just under 39 years old, the youngest admiral for over one hundred years, and only a few months older than Nelson had been, when he was created rear-admiral aged 38. However, this promotion was immediately followed by a crisis. Beatty was offered the post of second-in-command of the Atlantic Fleet, but refused it, wanting instead to be posted to the Home Fleet. This was seen as unacceptable arrogance from such a young officer, and he spend the next two years unemployed.
Beatty was rescued by Winston Churchill, who he had first encountered in the Sudan. In January 1910, Churchill was the newly appointed First Lord of the Admiralty and was in need of a naval secretary. Beatty impressed him with his ability to explain himself without using technical jargon, and his concentration on how the fleet should be used in wartime, rather than on technical issues. Churchill also gained Beatty his first squadron command, appointing him to command a cruiser squadron during the naval manoeuvres of 1912.
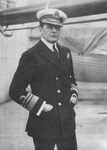
Finally, in March 1913 Beatty was given the job he was most famous for, commanding the battlecruiser squadron. His reputation as a dashing aggressive commander matched the image of the battlecruisers as exceptionally fast and hard hitting ships. However, Beatty was more than just an attacking admiral. He soon developed a clear role for the battlecruisers, which did not involve their use as high speed battering rams. Instead, Beatty decided that his battlecruisers should be used to provoke a general fleet battle. They would be sent out on sweeps into hostile waters, with the battleships of the Grand Fleet in distant support. The enemy would be forced to either let the British occupy their waters, or respond with either their own battlecruisers or battleships. Beatty would then retreat back towards the main battle fleet, which would destroy the pursuing enemy. Once battle was joined, the battlecruisers would protect the lighter cruisers as they pulled out of harms way, and then join the main line of battle. This would be almost exactly what would happen at Jutland.
At the outbreak of the war, Beatty was in command of the scouting forces of the Grand Fleet, based at Scapa Flow, under the overall command of Admiral Sir John Jellicoe. The navy had expected an early clash with the German fleet, but the Germans were not willing to take that risk, especially while the war on land was going so well. Many assumptions about the coming battle soon proved to be false – the north sea was not the ideal location for such a battle – it was prone to be either misty or clocked in fog and was soon filled with mines and submarines that restricted the movements of both fleets. With no radar, and primitive and often unreliable radio equipment, the only way to find the enemy was to use scouting forces. Even when enemy ships could be located, their exact location, and that of the scouts themselves, was often unclear. For many in the navy, the First World War would be an intensely frustrating experience, with only one proper battle, at Jutland.
Beatty’s war began with a minor victory at the battle of Heligoland Bight (28 August 1914). Originally intended to be a small scale operation that would ambush German light forces operating in the bight, Beatty’s battlecruisers were added to the British force, but without the knowledge of the commanders originally involved. The battle began in confusion in the fog, but ended with some success, as Beatty’s battlecruisers arrived on the scene. He was able to catch and sink a number of German cruisers. The fighting did reveal some serious problems, most of which were not solved until after Jutland. High speed gunnery turned out to be much harder than expected, and the British did not do as well as the Germans. Communications between ships of the fleet were difficult and sometimes unclear. Finally, the admiralty had failed to coordinate the operation properly, leading to moments when British ships were chasing each other in the mist.
On 22 September three Cressy class cruisers were sunk by German submarines off the Dutch coast. Jellicoe realised that Scapa Flow was vulnerable to U-boat attack, and moved the fleet to the west coast of Scotland and the Irish coast, while Scapa was reinforced. Beatty pressed for Cromarty and Rosyth to be fortified as naval bases at the same time, and would spend lengthy periods based at Rosyth.
The move to Rosyth was hastened by the German raid on the Yorkshire coast of December 1914. Beatty and his battlecruisers were part of the British force that came close to catching the German raiders, but once again poor signalling caused problems. Beatty’s light cruisers had made contact with their German equivalents. Beatty wanted to recall two of his cruisers, leaving two to stay in contact with the Germans, but the signal was vaguely worded and received by all four cruisers, essentially forcing them all to break contact.
In the aftermath of the German raid, Beatty and the battlecruiser fleet moved to Rosyth. Jellicoe retained overall command, but in the early stages of any German sortie the Admiralty would take command of the Rosyth and Harwich forces. They would then direct them towards the Germans, while Jellicoe concentrated on getting the Grand Fleet out to sea and heading south. Once Jellicoe was approaching the danger area, he would take command of the entire fleet.
The success against Yorkshire convinced the Germans that their battlecruisers could raid the British coast in some safety, without the support of the High Seas Fleet. This was tested on 23 January 1915, at the battle of Dogger Bank. Four German battlecruisers were dispatched to attack the British coast. Beatty, with Commodore Tyrwhitt, from Harwich, was sent to catch the Germans. The battle developed into a chase, as Admiral Hipper attempted to escape from the trap. Beatty’s ships carried heavier guns than their German counterparts, and there was a real chance of a significant British victory.
Instead, the Germans battlecruisers escaped, and the British could only claim the armoured cruiser Blücher. A misinterpretation of Beatty’s orders had meant that the Moltke was not under fire. She was able to concentrate her fire on Beatty’s flagship, the Lion, slowing her down, knocking out her radio and damaging her signal masts. From that moment, Beatty lost control of the battle. Aware of the threat of submarines, he ordered a course change to avoid a possible sighting, which allowed the Germans to increase their lead. His next signal was hard to read, and the intact part of his squadron concentrated on the Blücher, allowing the German ships to escape.
The battle of Dogger Bank revealed problems with British gunnery and signalling. Beatty concentrated on the signalling failure, and especially on making sure that his captains understood his overall plans. The potentially lethal design flaw on the battlecruisers was largely ignored.
The battle of Jutland was Beatty’s most successful operation. At the start of 1916 Admiral Scheer, the new commander of the High Seas Fleet, had made it clear that he wanted to take the fight to the British. At the end of May 1916, both the British and Germans planned to ambush the other side’s battlecruisers. On 31 May 1916, the German High Seas Fleet left harbour. Scheer hoped that the British would detect the battlecruisers, and respond with their own battlecruiser force, allowing the High Seas Fleet to catch and sink Beatty’s force.
Their plan was foiled when the Admiralty intercepted key German signals. Learning that the battlecruisers were about to come out, on the evening on 30 May the Grand Fleet went to sea. The only flaw in their intelligence was a failure to realise that the battleships of the High Seas Fleet were at sea on 31 May. As a result Jellicoe did not make maximum speed south through the North Sea, delaying the main action until later in the afternoon.
Beatty had clear orders for Jutland. If he found an inferior force of German battlecruisers he was to engage and destroy it. If he found the main German fleet, then he was to turn north and bring the Germans towards the Grand Fleet, giving Jellicoe his chance.
The first phase of the battle saw Beatty’s six battlecruisers take on Hipper’s five, with a division of British battleships rapidly approaching the scene. This phase of the fighting began at 3.48pm. The initial advantages went to the Germans, who had the advantage of the light, and superior range finding equipment, which meant that they were likely to get the best of the first part of any clash. Beatty’s battlecruisers had not really practised their gunnery enough – indeed the battleships were attached to his force while some of his battlecruisers were with the Grand Fleet, practising their gunnery.
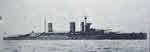
As a result, the Germans soon began to score hits on the British ships. Lion was hit early, but the main disasters came after twenty minutes, when HMS Indefatigable exploded, and after forty minutes, when HMS Queen Mary followed suit. This provoked Beatty’s most famous quote – “There seems to be something wrong with our bloody ships today”. Research after the battle suggests that there was indeed something wrong. The biggest danger to any warship came from her own ammunition. If flames reached the main magazines, then the ship was likely to explode. As a result the passageways that linked the guns to the magazines were meant to be protected against flames or high temperature gases coming down from the guns. At least one flash-proof barrier needed to be closed at any one time. However this slowed down the speed with which shells could reach the guns, and fast gunnery was seen as essential to the success of any long range naval battle. When German shells hit turrets, high temperate gases were forced down the various tubes, lifts and passages that linked the guns with the magazine, and the ship exploded.
This deadly phase of the battle ended with the arrival of Beatty’s battleships. The German battlecruisers now came under very heavy accurate fire, but many British shells failed to explode, or exploded too soon, before they had penetrated the armour. Admiral Hipper would later state that the poor quality of the British shells was the only reason his ships survived.
At 4.40pm the battle changed again. Commodore Goodenough, with the light cruisers, sighted the German battleships. Beatty was forced to turn north and run towards Jellicoe’s battleships. For an hour and a half the battlecruisers and the battleships of the fifth battle squadron were being chased by the entire German High Seas Fleet.
At 5.35pm Beatty made his last independent contribution to the battle. Realising that he was getting close to Jellicoe, he turned east. Hipper followed, turning away from the Grand Fleet. As a result Scheer ran straight into Jellicoe and the Grand Fleet, and only escaped by make two dramatic 180 degree turns. Having reached the Grand Fleet, Beatty came under Jellicoe’s direct control, and his surviving ships became part of the main line of battle. At 7.47pm he did suggest that his battlecruisers, with the leading squadron of battleships, should be detached to catch the Germans before they could escape, but despite Jellicoe agreeing to the plan nothing came of it, after Vice-Admiral Jerram reported that he was unable to make close contact with the battlecruisers.
Beatty’s excellent performance at Jutland has been overshadowed by the destruction of three battlecruisers, two under his direct command. Even without the technical flaws that probably contributed to their loss, the role of the battlecruiser force was essentially to act as bait, so they were always going to be vulnerable. On 2 June Beatty still had six battlecruisers available to him, while all but one of Hipper’s ships had been so badly damaged during the battle that they were out of action for some time.
Despite the overall inconclusive result of Jutland, Beatty comes out of it well. His main duty was to bring the High Seas Fleet under the guns of the Grand Fleet, and he performed this duty well. His turn to the east when close to the Grand Fleet prevented Hipper’s battlecruisers from spotting Jellicoe, and preserved the surprise. Post war controversies tended to focus on his handling of the Fifth Battle Squadron, only recently added to his command, and ignored the real job of the battlecruisers.
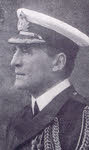
In November 1916 Jellicoe was appointed first sea lord. Aged forty-five, Beatty was given command of the Grand Fleet, and promoted to acting admiral. At this point the fleet contained 24 battleships, 3 battlecruiser as well as large numbers of smaller ships, and the battlecruiser force, as well as six rear-admirals and three vice-admirals, most, if not all of whom were significantly older than Beatty.
His first job in command of the Grand Fleet was to learn the lessons of Jutland. He introduced a system for plotting the position of all British and enemy ships. He was a great supporter of the use of aircraft and kite balloons to improve visibility. He was determined to increase the fighting spirit of the fleet, making apparently minor changes like changing the Battle Orders to Battle Instructions, to encourage other senior officers to take any chances that came their way. He himself chose HMS Queen Elizabeth as his flagship, because she was one of the faster ships in the fleet and would allow him to reach the crisis point of any battle. His efforts won him the loyalty of his subordinates, including many who had earlier been suspicious.
Technically the Admiralty produced more effective shells, while anti-flash measures were improved on all ships, in an attempt to prevent the disasters that had hit the battlecruisers at Jutland.
Despite all these preparations for battle, Beatty knew that there was no real strategic need for one. As long as the Grand Fleet remained in existence, the High Seas Fleet would be unable to break the British blockage of Germany. He was also aware that the southern North Sea was becoming increasingly dangerous for battleships, with ever more mines and submarines, and constant aerial reconnaissance.
The key naval campaign of 1917 was the unrestricted German submarine campaign. Beatty was one supporter of the convoy system, implementing convoys to Norway. Late in 1917 two of these convoys were destroyed by German surface ships, and so Beatty detached a division of battleships to cover the convoys, with the hope that a general battle might follow. There was one chance of this, when Scheer took the High Seas Fleet to sea in April 1918, but he failed to realise how regularly the convoys sailed, and missed the convoy. He argued in favour of aggressive anti-submarine warfare at a time when the equipment to carry out such operations simply did not exist.
After the entry of the United States into the war in April 1917 the Grand Fleet became an allied fleet. Six American battleships under Rear Admiral Hugh Rodman joined Beatty’s fleet. The two men worked together well, and the American ships operated as a genuine part of the Grand Fleet.
As the war came to an end in the autumn of 1918, Beatty began to expect that the German fleet might make one last sortie. This was Scheer’s plan, but the fleet mutinied, and refused to go to sea.
Beatty played a crucial part in the naval armistice negotiations, insisting on the unconditional surrender of the High Seas Fleet. He also stage managed the actual surrender, which saw the High Seas Fleet sail between two lines of ships from the Grand Fleet. The German ships anchored in the First of Forth, where Beatty issued his own most famous signal – “The German flag will be hauled down at sunset today, Thursday, and will not be hoisted again without permission”. Perhaps not the most tactful of gestures, it set the atmosphere for the captivity of the German fleet at Scapa Flow, which ended with the scuttling of most German capital ships.
After the war Beatty received a permanent promotion to admiral (1 January 1919), then became the youngest ever admiral of the fleet on 3 April 1919. He was able to fly his flag for four days, before on 7 April the Grand Fleet was officially disbanded. In September 1919 he was appointed first sea lord, with the difficult task of defending the navy against any over-enthusiastic reductions in size, while simultaneous reducing the size of the fleet to a suitable peacetime level. During the eight years he held the post, Beatty managed to maintain a strong force of cruisers, and fought for the establishment of a strong naval base at Singapore. He was unable to win the navy control of its own aircraft, which remained with the RAF until 1937. This was also the period of the Washington naval treaty, which imposed limits on the construction of new capital ships. Beatty was opposed to this, but was overruled by the cabinet, who wanted to maintain a close alliance with the United States.
One lesson Beatty had learnt during the war was the need for good staff work to support the admirals. During his time as first sea lord, the Naval Staff College was formed at Greenwich, and he reinstated the senior officer’s war course. The period also saw the creation of the Department of Scientific Research and the Admiralty experimental laboratory at Teddington. Perhaps most importantly, he was a key supporter of the Chiefs of Staff Committee, which played an important role in coordinating the British war effort during the Second World War. When he retired in 1927, Beatty had become the longest serving of all first sea lords.
Beatty died in 1936. In retirement he had suffered a number of horse riding accidents, which had caused breathing difficulties. In late 1935 he had caught the flu, but had insisted on serving as a pallbearer at Admiral Jellicoe’s funeral.
Beatty had been genuinely popular on the lower decks, perhaps partly because his was responsible for their first pay rise for some year in 1919. In that same year he had been the guest of honour at a banquet held by the men of the fleet at Portsmouth.
Despite his dashing image, Beatty was not an impetuous commander. He had thought out his plans, and understood many of the problems posed by modern naval warfare in 1914-1918. He did not take part in the arguments that broke out between his supporters and Jellicoe’s about the battle of Jutland, where in any case Beatty’s performance is hard to criticise. He maintained the morale of the Grand Fleet in the two frustrating years that followed Jutland. His time as First Sea Lord was dominated by the need to make cuts in the fleet, and by the restrictions of the Washington Naval Conference, but he played a crucial role in developing a professional navy during this difficult period. The lack of any clash between the battle fleets after Jutland mean that he is still best known for his time with the battlecruisers.
 Official History of the War, Naval Operations Vol. I, Sir Julian Corbett. Volume one of five in the British Official History of the First World War at sea, this book covers the first five months of the war, from the period of tension before the fighting began to the battle of the Falklands. This was the period that saw the most action on the surface outside the North Sea, with a number of German cruisers at large. [see more]
 Official History of the War, Naval Operations Vol. II, Sir Julian Corbett. Volume two of five in the British Official History of the First World War at sea covers the naval attack on the Dardanelles and early months of the Gallipoli campaign. On the home front it includes the German raid on the Yorkshire coast of December 1914 and the battle of Dogger Bank [see more]