|
|
|
|
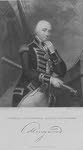
Horatio Nelson is probably Britain’s most famous sailor. He was directly responsible for three major naval victories, and played an important role in winning a fourth. His death at Trafalgar made him into a tragic hero, while his affair with Lady Emma Hamilton is still famous today. He was a public hero during his life, even having a Haydn Mass named in his honour. Despite his death ten years before the end of the war, he played a major role the defeat of Napoleonic France.
Like many things at the time, early advancement in the Georgian navy could depend very heavily on family or other influence. Although his father was a clergyman, the young Nelson was not lacking such contacts. At the age of twelve he left his Norfolk home to go to sea on a ship commanded by his uncle, Maurice Suckling. Suckling was later to become Comptroller of the Navy, a position that allowed him to help his young nephew gain good postings at key moments in his career. Promotion in the navy was a peculiar business. A young midshipman could rise through the ranks to post-captain, in charge of a ship of twenty or more guns, at least in part through individual merit, and at great speed, but once a man was a post-captain promotion was strictly by seniority – any captain who survived long enough could expect to reach the rank of admiral.
Nelson entered a triumphant navy. The Seven Years War (1756-63) had seen a series of British naval victories that had established Britain as the world’s greatest Imperial power and the Royal Navy as the dominant force on the world’s oceans. This global role is reflected in Nelson’s early service – in the years before the American War of Independence Nelson served in the West Indies, the Arctic and the East Indies, where he was involved in his first sea battle. This action was a skirmish in the war against Haidar (or Hydar) Ali of Mysore in which the frigate Nelson was serving on, H.M.S. Seahorse, captured a ship serving in his navy.
The next year, 1775, saw Britain’s Imperial honeymoon end as her American colonists rose in revolt. Nelson was for the moment on the wrong side of the world, but he was invalided home, not a rare occurrence for Europeans serving in India at this time, nor the only time Nelson forced ashore by illness, or more often injury.
Nelson was soon back at sea. In April 1777 he was promoted to lieutenant, aged only 19. His uncle was able to get him posted to H.M.S. Lowestoffe, one of the best frigates in the navy, and one which soon headed out to the West Indies.
Once in the West Indies, Nelson was soon transferred to the flagship of Sir Peter Parker, the commander in chief. He quickly rose to the rank of first lieutenant, normally the second in command of a warship, third in command on the flagship behind the Admiral and the ship’s captain, although in normal circumstances the Admiral rarely interfered with the actual running of the ship (in this Nelson was later to prove something of an exception).
From first lieutenant of the flag ship, Nelson quickly moved on to independent command. Smaller ships had commanders rather than captains, and in December 1778 Nelson was made commander of the Brig Badger. Finally, in June 1779 he was promoted to post-captain, with command of his own ship, the frigate Hinchingbroke, and a near certainty that seniority would see him reach admiral’s rank (that is not to say that all captains became active admirals – just as captains were not always guaranteed a ship, admirals were not always sure of a fleet).
The War of Independence was not one of the Navy’s prouder moments. Indeed, their failure to keep the French fleet blockaded in European waters is often blamed for the loss of the war. Nelson had a mixed war. In 1780 his ship was sent to support a disastrous attack on Nicaragua. While the original aim of the expedition, the capture of the Fort of San Juan, was actually achieved, its capture had little or no impact on the war, and it was soon abandoned. Worse, the season was chosen poorly, and Yellow Fever killed well over half of the expedition. Nelson was amongst the sufferers, and was forced to return to England to recover. The one benefit to come out of it was that it was on this expedition that he first met Cuthbert Collingwood, later to be one his ‘band of brothers’.
After spending a year recovering from the Yellow Fever, Nelson was quickly appointed to command of another frigate, the 28 gun Albemarle. He was to command this ship until July 1783, when with the war ending the Navy was reduced in size.
His time on the Albermarle saw mixed results. On the plus side, he first came to the attention of Admiral Samual Hood, who with Admiral Rodney had been responsible for the British victory at the battle of the Saints. This battle had seen the enemy’s line of battle broken for the first time in over a century, an achievement that was to alter the nature of naval warfare. Naval warfare had become a rather static affair, with the opposing fleets battering each other in two lines, until one side was forced to withdraw. Major victories were almost impossible to achieve, as by the time one fleet was forced to withdraw, the other side would be nearly as badly damaged, and unable to take advantage. Hood and Rodney’s achievement at the Saints helped pave the way for Nelson’s later victories. Hood was also to play a more direct part in Nelson’s career, as he was in command of the Mediterranean fleet at the outbreak of the French Revolutionary wars.
On the minus side, his time on the Albermarle saw one of the few unqualified failures on Nelson’s record. Early in 1783, the French seized Turks Island in the Bahamas. Nelson was in command of an expedition to recapture the island – indeed, he appears to have largely responsible for every aspect of the campaign. It was a total failure, with the blame falling correctly on Nelson, who had been in charge of the poorly planned attack.
This failure did not harm Nelson’s career. At the end of the American War of Independence, the navy rapidly shrank as ships were paid off. A wartime establishment of over 100,000 men was reduced to one of under 40,000. Nelson was amongst the 40,000.
His new ship was the Boreas, another frigate. Once again, he was posted to the West Indies, this time to police the Navigation Acts, which controlled all trade with British colonies. His main duty was to intercept potential smugglers, a category which now included the Americans who until recently had been the main trading partners of the colonists.
Nelson found himself almost entirely without local support. Just about every person of influence in the West Indies stood to benefit from the trade, even including Nelson’s commanding Admiral. Nelson was the victim of seemingly endless lawsuits as a result of his attempts to carry out his orders, and soon came to hate the area.
The one bright spot in this period was that it was now that he met Frances (Fanny) Nisbit, who he was soon to marry. She was the niece of a former President of the island of Nevis, where she was then working as housekeeper to the richest of the Island’s merchants. They married in 1787 on Nevis, with Prince William Henry (the future King William IV), who was then serving in the navy, giving Fanny away. Their marriage survived reasonably well for ten years, before the famous romance between Nelson and Emma Hamilton swept it away.
The first five of those years took place in Norfolk. Nelson’s command came to an end in 1788, and the married couple returned to Burnham Thorpe in Norfolk, the Nelson family home, where they lived on half pay, while Nelson waited for a new ship. Nelson was not happy on shore, and convinced himself that he was being punished for his actions in the West Indies. In reality, the shrunken navy simply did not need many captains, and there were a great many men more senior than Nelson with a superior call on the few ships available.
Nelson was rescued from the beach by the outbreak of revolution in France. Nelson’s reaction was jubilant. The chance to get back to sea overwhelmed any concern he might have had about the dangerous times ahead.
Nelson’s worries about the attitude of his naval superiors were quickly dispelled. In January 1793 he was offered immediate command of a 64 gun four-rate ship of the line, the Agamemnon, and promised command of a 74 gun third-rate once one became available. Even better, Nelson and the Agamemnon were immediately ordered to the Mediterranean, where Admiral Hood was commander in chief.
Nelson found himself involved in a war that was being very poorly directed. The British plan involved attacks on French colonial possessions, combined with a variety of poorly planned and supported attempts to aid French Royalists.
Nelson was directly involved in one such attempt. In May 1793, the Mediterranean fleet had moved to blockade the main French port at Toulon. France at this point was a mass of contradictions. At the same time as she was threatening to overrun the Low Countries and was poised to invade Austrian dominated northern Italy, she was on the verge of civil war.
In August 1793, that civil war came to Toulon. The city was taken over by Royalists, who invited Lord Hood to occupy the city. Properly supported, this could have been a crushing blow, and should have cemented British control of the Mediterranean for years to come. Instead, it turned into something of an embarrassment.
The British could only provide 2,000 soldiers. This was far short of the numbers needed to defend Toulon against attack from the land. Nelson was sent to Naples to try and gain more troops from King Ferdinand III. With the help of Sir William Hamilton (more of him later!), Nelson was able to persuade the King to promise 10,000 troops, although only 3,000 had arrived before the port had to be abandoned.
The allied garrison in Toulon eventually reached 12,000 effective soldiers, scraped together from Spain, Austria, Britain and Naples, amongst others. However, it was never strong enough to defend the port. Their position was made worse by the arrival of a promising young French artillery officer by the name of Napoleon Bonaparte, whose skilful positioning of the French artillery made the port indefensible.
The final attack came on 18 December. The allied troops were forced into a rapid evacuation. Despite having had months to prepare, their attempts to destroy the port facilities were half-hearted, and the French were soon able to put the port back into use. Nelson was at Livorno (Leghorn), three hundred miles to the east on the Italian coast, although he did play a part in the evacuation, an experience that confirmed his strongly anti-French views.
The loss of Toulon left the Royal Navy looking for a new base. Fortunately, one quickly came into view. Somewhat ironically, this was Napoleon’s birthplace of Corsica. The island had fought to free herself from Genoese rule, but when Genoa finally got tired of the struggle, she sold the island to France. The French were no more popular than the Genoese had been, but had managed to crush the most recent revolt.
The revolution saw this change. General Paoli, the commander of the 1767 revolt, was allowed to return from exile in England, but he soon turned against the violence of the revolution. Just as the navy was looking for a new base, Paoli offered the British sovereignty of Corsica. The only problem was that there was a French garrison on the island.
The Corsica campaign began with the easy capture of the port of San Fiorenzo, in the north east of the island in early 1794. The next step was to capture Bastia, a bigger town on the east coast of Corsica. This operation caused a blazing row between Admiral Hood and General David Dundas, the senior army officer present. Dundas was an unimpressive soldier, who owned his command to his brother, the Secretary of War. This sort of nepotism was common in that army, but almost unheard of in the navy.
Dundas refused to take any part in the attack in Bastia. Hood claimed overall command of the expedition. Dundas responded by resigning and heading back to Britain in a foul temper. With the army temporarily leaderless, Hood proceeded with the assault on Bastia.
As a result of this row, Nelson found himself in command of a land siege, despite the numerical disparity between the 12,000 soldiers and 300 sailors involved in the action. While the senior army officers sulked, Nelson spent two months ashore, energetically directing the siege, which ended in success on 22 May.
On the following day the new army command, General Stuart, reached Corsica. He was more cooperative, and relations between the army and navy were much improved. This was fortunate, as their next target, the town of Calvi on the west coast of the island, was very strongly fortified. This siege dragged on until 10 August, but is most famous as the battle that cost Nelson the sight of his right eye.
The damage was done by a shower of stones caused by a near miss. Nelson did not actually lose his eye, and was still able to distinguish between light and dark, but the sight was gone. Contrary to popular belief, Nelson never wore an eye patch. The nearest he got was a green shade worn like the peak of a cap. Sadly, all this effort had little long term effect, as Corsica had to be abandoned two years later after Napoleon’s dramatic campaign in northern Italy.
The seizure of Corsica was the last British success in the Mediterranean for some time. Admiral Hood had returned to Britain, and for some time Vice Admiral Hotham had command of the fleet. He was not one of Britain’s more daring Admirals, and under him Nelson missed his first chance at a fleet action.
The French had repaired the limited damage done to Toulon, and had a fleet of 17 ships of the line in the port. Their orders were to find and defeat the British fleet, allowing the recapture of Corsica and the removal of a threat to all of their plans in Italy. The French fleet sortied in the spring of 1796. Admiral Hotham sailed to intercept with a slightly smaller fleet of 16 ships of the line. On 13 March the two fleets came into contact.
Despite their slight numerical superiority, the French proved unwilling to give battle. There even developed the rather farcical situation of the smaller British fleet chasing the larger French one! Nelson had the chance to distinguish himself in the chase, as the Agamemnon was one of the faster ships in the fleet. In an encounter lasting two hours, she forced the surrender of the Le Ca Ira, a ship of the line of 84 guns.
This was a notable achievement, but Nelson was not satisfied with such a minor victory. Unfortunately, Hotham was, and the chance for a major naval victory was lost.
The next year was frustrating for Nelson. The significant events were happening on land, as the French advanced along the coast towards Italy. Nelson found himself on blockade duty, trying to stop a massive coastal trade with an inadequate squadron. On the positive side, he was promoted to Commodore on 27 March (coincidently the same day as Napoleon’s first Order of the Day as commander of the Army of Italy). Nelson’s diplomatic experience convinced him that the Austrian army would collapse under the first impact of battle, and he was rapidly proved right. In November, Admiral Jervis (later Lord St. Vincent) arrived to take command of the fleet. Nelson quickly became one of his favourite captains. Most of Nelson’s famous band of brothers were actually selected by Jervis, who had a brilliant eye for a good captain.
The collapse of the Austrian position in Italy left the British fleet dangerously isolated. The Mediterranean fleet was the least important of the three fleets being maintained at the time. The channel fleet was essential to the defence of Britain, while a second fleet had to maintained at Gibraltar, in part to support Portugal, Britain’s one remaining ally in Europe.
Corsica was abandoned by the end of October. December saw him at Gibraltar. Spain, having started the war as an ally, now became an enemy. While in command of a frigate, La Minerve, with orders to withdraw the British officials on Elba, Nelson had his first hostile contact with ‘the Dons’, a very severe dual with a Spanish frigate almost exactly the equal of his own. The Spanish ship was captured, but then very quickly lost when a more powerful Spanish force appeared.
The aftermath of this encounter sees Hardy coming on to the scene. As the commander of the boarding party that had briefly captured the Spanish frigate, he had briefly been captured, before being exchanged for the captain of the Spanish ship.
Soon afterwards Hardy was nearly lost attempting to save a sailor who had fallen overboard. Nelson risked an encounter with the pursuing Spaniards by slowing down the ship for long enough to pick up Hardy’s boat. Luckily, the Spaniards also slowed down, allowing Nelson to escape. A bond was formed that lasted until Trafalgar.
Hardy’s rescue took place while Nelson was on his way from Gibraltar to rejoin Admiral Jervis with the fleet off Cape St. Vincent. Unlike the previous year outside Toulon, both sides were willing to risk battle, although for different reasons.
The Spanish fleet was at sea to protect a convoy containing mercury, essential to the production of Spanish silver. While the Spanish had no desire for a battle, the convoy had to be protected. Jervis on the other hand was simply determined to have his battle, and was confident that his fleet could deal with anything the Spanish might try.
On the evening after saving Hardy (12 February 1797), Nelson had a close encounter with the Spanish fleet. Fogbound on the night of the 12th, as visibility returned La Minerve found herself surrounded by dimly visible ships. Nelson was able to slip through the Spanish fleet, and on 13 February rejoined Jervis and the fleet with news of the Spanish fleet.
With battle close, Nelson was restored to command of the Captain, a 74 gun ship he had transferred to when the Agamemnon had been unable to continue without repairs.
The morning of the 14th was misty. As the mist lifted, the British quickly became aware that they were badly outnumbered. The Spanish had 27 ships of the line, while the British had only 15. However, Admiral Jervis has spent his time with the fleet whipping it into shape. As the mist rose, the British fleet emerged in a tight formation, while the Spanish fleet had split into two.
The smaller part of the Spanish fleet was to the leeward of the British (downwind). Ordinarily, this would have made the leeward squadron very vulnerable to British attack, but Jervis was more interested in the larger windward squadron. If he had known that the smaller force contained the invaluable mercury convoy, then his attitude would probably have been different, but the defeat of the larger part of the Spanish fleet seemed to be of more significance.
Jervis’s plan was to sail between the two Spanish squadrons to prevent them joining, then deal with the larger Spanish squadron on almost equal terms, at least in numbers. This was a tricky manoeuvre, as the Spanish windward squadron had the advantage of the weather.
What happened as the fleets met was to make Nelson’s reputation. To understand how dramatic his actions were, we must understand the nature of naval discipline in the Georgian navy. The Admiral’s orders were to be obeyed at all times. Individual initiative on the part of ship’s captains was not tolerated during a battle. If Nelson had failed, his career would probably have been at an end.
Luckily for Nelson, his great gamble achieved its object, and helped lead to a significant British victory at a time when one was greatly needed. Jervis’s plan began well. The British fleet was able to get into the gap between the two Spanish squadrons. However, Admiral Cordoba had the advantage of the wind, and it became clear to Nelson that the Spanish were going to escape by sailing behind the British fleet.
Without waiting for orders, Nelson broke out of the British line. He swung around to the leeward, curving round to place his ship in front of the Santissiama Trinidada (a ship he was to encounter again). Nelson’s move forced the tip of the Spanish fleet to change course, slowing it down.
Soon after this, Jervis ordered the fleet to tack to the right (into the wind), having come to the same conclusion as Nelson, although without Nelson’s move this move would probably have come too late. Nelson’s great gamble has paid off, although it was still to be mildly criticized after the battle.
For the moment, he was heavily pressed by Spanish fire. The Santissiama Trinidada was the biggest warship in the world, a massive four deck ship of the line, and the Captain was seriously outgunned. It soon became clear that the only way she could play any further part in the battle was to grapple with one of the Spanish ships while she still had the chance.
His first target was the San Josef. As if his breaking of the line wasn’t enough to ensure his fame, Nelson now made absolutely sure of it. In an attack led by Captain Berry, Nelson was amongst the first half dozen men to cross over to the Spanish ship. Having captured the San Josef, Nelson then discovered the San Nicholas was trapped against her side. Nelson ordered an attack on the San Nicholas, launched from the San Josef.
This attack was also a success. Nelson had captured two ships of the line, taking a personal hand in both assaults, as well as preventing the Spanish fleet from recombining. His method of boarding the San Nicholas became known as Nelson’s Patent Bridge for boarding First Rates (his own name for it – at this point in his career Nelson was not afraid of creating his own publicity).
The Battle of Cape St. Vincent was a much needed British victory at a low point in the war. Four Spanish ships had been captured without lose. Admiral Jervis was quickly created Lord St. Vincent. Nelson himself was promoted to Rear-Admiral soon after the battle, although this was the normal action of seniority rather than any reward for his actions in the battle. His personal reward was to be made a Knight of the Bath (one of the supporters of his coat of arms was a sailor trampling on the Spanish flag).
True to form, Nelson was soon to suffer a serious setback. In the aftermath of the battle, he was given command of the squadron blockading Cadiz, where he far too much of a direct part in the fighting. This tendency was soon to lead to disaster.
Admiral St. Vincent now had news of the arrival of a Spanish treasure ship in the Canary Islands. He decided to send a force of four ships of the line to capture it, and placed Nelson in command. Unfortunately, Santa Cruz on Tenerife was a well defended port. An attempted surprise attack on the night of 23 July was foiled by unexpected currents, a reminder of the poor quality of the charts then available for many parts of the world.
Nelson decided to try another attack on the following night. This time he commanded the attack in person. This second attack made a little more progress, but only enough to expose Nelson and his force to devastating Spanish fire from the citadel. Nelson was hit in the arm.
The shot shattered his elbow. On his return to his flag ship, the arm had to be amputated. Nelson was convinced that his career was over, writing that ‘a left-handed admiral will never again be considered useful’, and imagining an immediate retirement to a cottage.
His worries were premature. He rejoined the fleet on 16 August and from there returned to England. By early December he was fit again, and pestering the Admiralty for a new command. The First Lord of the Admiralty decided that he did have use for a left-handed Admiral, and Nelson was once again at sea.
 Nelson's Navy, Brian Lavery. A fascinating book that covers every aspect of life at sea in Nelson's navy, from ship building to the daily life of the sailors. If you have any interest in naval warfare, or in life at sea, then this book is essential for you.