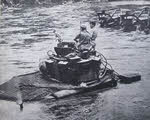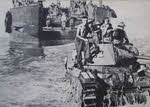
Matilda II Tank lands at Toko Beach, Bougainville
|
|
The Matilda Infantry Tank Mk II (A12) was the most capable British tank of 1940, but was slow to produce, could only carry a 2pdr gun, and was thus soon obsolete. Despite this it remained in active service with the Australians in the Pacific, and was the only British tank designed before the outbreak of war that was still in use on the front line at the end of the war.
The designation of the A12 can cause some confusion. It was preceded by the A11 Matilda, Infantry Tank Mk I, a much smaller vehicle. When the A12 was first developed it was called the Matilda Senior or Matilda II, Infantry Tank Mk II. The A11 Matilda was withdraw after most were lost in France in 1940, and the A12 then became simply the A12 Matilda, Infantry Tank Mk II. As more versions of the A12 were developed they were given mark numbers, so the A12 Matilda Mk I, was a different weapon to the A11 Matilda I, and the A12 Matilda Mk II was different to the original A12 Matilda II.
Development
The idea of the Infantry Tank first appeared in the mid-1930s, as a result of infantry exercises that suggested the need for a slow moving heavily armoured vehicle that could break through the enemy front line and create a gap for the infantry to exploit. In 1934 two ideas were suggested - either a small machine gun armed tank that could be produced in very large numbers and swamp the enemy, or a larger cannon-armed tank with thick enough armour to take on field artillery. In October 1935 the small tank was adopted, on the grounds that more could be produced within the limited budget available. The new vehicle was given the General Staff specification A11 and the codename 'Matilda'.
In September 1936 the Matilda pilot A11E1 was delivered. At the same time work began on a design for a larger tank. Early specifications called for a three-man crew and higher speed of 14mph. Weight was to be limited to 14 tons to allow the tank to cross existing military bridges. By December the new tank had been given the General Staff specification A12. The basic layout was based on the Vickers A7 Medium Tank of the early 1930s, a design that had been scuppered by mechanical failings.
The original specifications called for an armament of two machine guns, but this was quickly replaced by a 2-pounder anti-tank gun (then one of the best anti-tank guns in the world) and co-axial Vickers machine gun. At the same time the crew was increased to four to allow for a three-man turret. There was some criticism of the 2-pounder gun on the grounds that it lacked a good high explosive round, but these were overruled. Provision was also made for the tank to carry the rather useless 3in howitzer, which could only really fire an effective smoke shell.
The new tank was clearly going to be too heavy for any existing tank engines, and so the decision was made to use two linked engines. An AEC straight-six water-cooled diesel engine, used in London buses, and providing up to 87hp, was selected. Suspension was to use the 'Japanese Type' bell crank suspension used on Vickers Medium tanks.
The A12 was to be produced by the Vulcan Foundry at Newton-le-Willows in Cheshire. In November 1936 Vulcan was given a contract to produce wooden mock-ups and two mild steel prototypes. The first mock-up was inspected in April 1937, and the first prototype (A12E1) was delivered for trials in April 1938. The vehicle performed well in a 1,000 mile trial, although the gearbox and suspension needed to be slightly modified and the cooling improved. Air cleaners were also added to allow 'colonial' use.
Production
In June 1938 Vulcan received an order for 140 tanks. It was soon clear that one company wouldn't be able to produce enough tanks, and so in August Ruston & Hornsby of Lincoln received an order for 40 tanks. Eventually John Fowler & Co. of Leeds, the North British Locomotive Company of Glasgow, Harland & Wolff of Belfast and the L.M.S. Railway Company all received orders to produce the A12 Matilda. Production went on for far too long, and the final order, for 75 tanks from Fowlers, wasn't placed until March 1942. By the time production ended in 1943 somewhere between 2,890 and 2,987 Matildas had been built.
Few of these tanks were available when they would have been most useful. Only twenty four were completed during 1939, and another 356 in 1940. In the period between September 1939 and September 1940 the L.M.S. produced the most tanks, a total of 88, followed by Vulcan, with 80. Production really took off in 1941, when 1,038 were completed, and peaked in 1942, with 1,330 built. By this point more powerful tank guns and anti-tank weapons meant that the Matilda was increasingly vulnerable, while its 2-pounder gun was virtually obsolete. The final 143, completed in 1943, were effectively useless.
In the summer of 1940 the British Tank Mission to the United States looked into the possibility of putting the Matilda into production in American, but after the fall of France American producers were no longer interested in taking on foreign designs. Instead they expected that American production would soon be scaled up, and so they preferred to supply the British with designs already accepted by the US Army. As a result the Matilda never entered production in the United States. In September 1940 one Matilda (Grampus) from 7th RTR reached Maryland from Canada, with its crew in plain clothes. The Americans felt the Matilda was cramped and under-powered. One result of this trip was the development of a system to link two General Motors two-stroke diesel engine for use in the possible American Matilda. This was the basis of the similar system adopted in some M4 Shermans.
Description
The A12 Matilda II was more than twice as heavy as the A11 Matilda I. It had a wider hull, a larger turret, and thicker armour.
After the invasion threat had receded many of the AEC powered Matilda Mk Is and Mk IIs were given Leyland engines, effectively turning them into Mk IIIs.
The Matilda was significantly heavier than previous British tanks, and so needed more power. None of the normal tank engines of the time were up to the job, and so it was given two AEC diesel engines, normally used in buses. These were later replaced with more powerful Leyland diesel engines. The Matilda was the first British tank to use diesel fuel, and the War Office would have preferred most tanks to use that fuel. The two engines were mounted side by side in the rear half of the tank. Each engine drove a spur gear at its front, and the power was then combined to power a single drive shaft.
The double engine system did cause some reliability problems, as it was comparatively easy to burn out one of the pair of clutches if the controls weren't carefully balanced. On the plus side the tank could crawl along on a single engine if needed.
The Matilda also used a more advanced transmission and steering system than previous British tanks. Most had used simple four-speed gearboxes, but the Matilda used a Wilson epicyclic six-speed pre-selector gearbox powered by compressed air. This allowed the driver to place the gear lever in position for his next planned gear change but keep driving in his current gear until he operated the clutch, at which point the tank would change gear.
Steering was provided by Rackham steering clutches between the gearbox and the final reduction gears. Power then went to the rear drive sprockets.
The hull was made up of a series of large cast pieces, which were bolted together to form the tank. This made it very sturdy, but each stage in the process required specialist skills and slowed down production. The nose was particularly complex, and caused many delays.
Suspension was provided by a system using bellcranks and horizontal coil springs. It was known as the 'Japanese type', not because it had been developed in Japan, but because it had first appeared on the Vickers Medium C tank sold to Japan in 1928. It wasn't very effective at high speeds, but tests showed that it was very good at the sort of speeds expected of the Matilda. The prototype and early production tanks used normal return rollers, but most production tanks used skid rails instead. The suspension and tracks were protected by 25mm thick side skirts, with complex mud chutes and hinged inspection panels to allow maintenance. The one piece armoured skirts were among the most difficult parts of the tank to produce, and the number of mud chutes was reduced from six on the prototype to five on production machines in an attempt to make things easier.
The Matilda had a large idler wheel at the front, raised up almost to the level of the return wheels or skid rails. Just behind that was a Jockey roller that could adjust the tension of the track. Next came ten pairs of small diameter road wheels, with two pairs carried on small lower bogies. These were mounted below larger suspension levers, which were mounted in two pairs and a single. The two pairs were connected by horizontal springs mounted above them, and the single level was connected to the rear pair with a third shorter horizontal spring. Finally the large drive wheel was raised up so that the top was level with the top of the track.
The Matilda was very heavily armoured, with up to 78mm at the front. The suspension was protected by 25m thick side skirts and the thinnest armour was still 20mm thick. This made it largely immune to any pre-war anti-tank gun and most artillery, and this didn't really change until 1941.
The turret was mainly cast, but with separate top panels, which carried a drum-shaped cupola on the left and a loader's hatch on the right. The gunner sat at the front-right of the turret, with the commander behind him and the loader/ radio operator to the left. The turret had a hydraulic power-traverse system, but elevation was manual, controlled by the gunner's shoulder. The gun was well balanced, with a heavy part of the breach end inside the turret.
The 2-pounder gun used a shell that could be carried in one hand. It was a semi-automatic weapon, so after each shot the empty shell case was ejected and the breach opened ready for the next shell to be installed. Early versions were armed with a Vickers water-cooled machine gun, but from the Mk II onwards a Besa air cooled gun was used instead.
Combat
The A12 Matilda II entered service alongside the older A11 Matilda. Only two were in service in September 1939, and only 23 were available when the Germans attacked in the west in May 1940.
In May 1940 7th Royal Tank Regiment had twenty-three A12 Matildas, alongside twenty-seven of the much lighter A11 Matilda I and seven light tanks.
France, 1940
By 20 May eighteen of the A12s were still in use, and they took part in the one British counterattack of the campaign - the Battle of Arras of 21 May. Here they performed quite well, but were present in far too small numbers to have any real impact on the wider fighting. The Germans had virtually nothing that could penetrate the front armour of the Matilda II - their main anti-tank gun at the time was an ineffective 37mm weapon. In 1940 the 2-pounder gun was more than capable of dealing with any German tank of the period.
The lack of a good HE round was probably their biggest technical problem, making it hard to knock out German artillery and anti-aircraft guns. Their tracks also caused some problems, filling up with mud and losing grip.
More serious was the unexpected nature of the fighting. The Infantry Tank had been designed to support walking pace infantry attacks on fortified positions, not to deal with fast moving situations. The Matilda II wasn't fast enough to cope, and a lack of tank transporters meant that many British tanks wore themselves out attempting to catch up with the Germans.
Home Defence
In the aftermath of the evacuation from Dunkirk, in which every single Infantry tank sent to France was lost, the only Matilda IIs left in Britain were with the 8th Royal Tank Regiment, which had a mix of A11 Matilda Is and A12 Matilda IIs. The A11 was soon withdrawn, and the A12 became known as the Matlida.
As more Matildas became available they were largely allocated to the Army Tank Battalions, which were made up of regiments from the Royal Tank Regiments. They were also used by the 16th/5th and 17th/21st Lancers, both part of the 6th Armoured Division. Each squadron had two Matildas with their HQ. They were also used by the 1st Canadian Army Tank Brigade in 1941.
Some of the regiments equipped with the Matilda were given special trains in an attempt to improve their mobility. The idea was that the tanks would use the trains to reach the threatened area, then disembark to deal with any German troops, allowing the limited number of tanks to cover a wider area.
The Matilda wasn't very well suited to use in Britain. The twin engine layout and Rackham steering clutches tended to suffer damage when they were used repeatedly, as was the case on the winding British roads.
North Africa
In September 1940 the 7th RTR arrived in Egypt, bringing with it a new batch of A12 Matildas, the first to reach North Africa. They were allocated to the 4th Indian Division. The Matilda would gain an impressive reputation in North Africa. Many of the reliability problems encountered in Britain would disappear in the desert, especially those related to the steering, which was put under much less pressure in wide open spaces.
General Wavell decided to use his Matildas to launch an assault on the Italian positions at Sidi Barrani (Operation Compass). This began on 9 December 1940, and the Italian position soon collapsed. The Matilda proved to be immune to Italian fire, while the faster cruiser tanks were able to get behind the Italian positions and cut them off. Over the next few days the Italians suffered a crushing defeat and were forced to retreat back to Bardia. On 6 January 1941 the attack was renewed, and Bardia fell. The 7th RTR contributed twenty-two Matildas to this fighting, with six taking part in the key attack from the south. In mid-January 1941 Wavell attacked and captured Tobruk, and the 7th RTR was able to contribute sixteen Matildas to the two-day long battle. This ended the Matilda's part in this first battle. They had travelled 200 miles, and were worn out and in need of a refit. The final stage of the operation required the speed of the cruiser tanks. The Matilda's performance in these early battles won in the nickname 'Queen of the Desert'.
The Matilda II took part in the Eritrea campaign of January-February 1941. B Squadron, 4 RTR, with sixteen Matildas and one light tank provided the armoured contingent for this successful campaign against an Italian army that was rather better led than its equivalent in Libya. The tanks were shipped directly to Port Sudan, and most of them remained in use throughout the entire campaign.
1941 saw a handful of Matildas scattered around the Mediterranean theatre. Six of nine from the 7th RTR were captured by the Germans on Crete. A few went to Malta.
On 19 April 1941 the 7th RTR sent some of its Matildas into the besieged town of Tobruk, arriving by sea. They played a part in defeating Rommel's attacks on the town.
Badly needed reinforcements arrived in the famous Tiger Convoy. A total of 238 tanks reached Egypt in this convoy, with 135 Matildas making up the largest contingent. They were used to reinforce the 4th RTR and 7th RTR, both of who had played a major part in the fighting to date.
The new tanks took part in Operation Battleaxe (June 1941). The Matilda equipped two of the four regiments in the 7th Armoured Division during this battle. This time the Matildas performed less well. They were forced to operate in small units, and used against well-dug in German 88s. The tables were now turned, with the German guns able to take out the Matilda at twice the effective range of its gun. 4th RTR lost almost all of its tanks early in the battle. 7th RTR did a bit better, taking Capuzzo, but the wider operation ended in failure and many British tanks had to be left behind during the retreat.
By November 1941 the Matilda equipped the 8th RTR and 42nd RTR (1st Army Tank Brigade) and the 4th RTR and D Squadron (32nd Army Tank Brigade) in Tobruk.
The failure of Operation Battleaxe had seen General Wavell replaced by General Auchinleck, who prepared to carry out a massive attack on the Germans and Italians, with the aim of pushing them out of North Africa (Operation Crusader, November 1941). The 1st Army Tank Brigade was posted towards the northern end of the Allied line, to provide support for the troops facing the Axis front line. 32nd Army Tank Brigade was to break out of Tobruk as soon as possible. The cruiser tanks were to operate further south and swing around the Axis front line. The British attack ended in some chaos, but Rommel then launched his own counterattack, intending to get behind the British lines. The failure of this attack forced Rommel to begin a slow retreat back past Beda Fomm and allowed the Allies to lift the siege of Tobruk.
In the aftermath of Operation Crusader the Germans retreated to the Gazala line, and some Matildas moved west. Most of them were lost in the German offensive that forced the Allies back into Egypt. Four were still in action as late as July 1942, during the First Battle of El Alamein, but after that it was withdrawn as a gun tank in British service.
New Guinea
Australia was the third biggest user of the Matilda, after Britain and the Soviet Union. She received 409 tanks, mostly late production vehicles, and probably fresh from the production lines. The first twenty arrived in March-April 1942, as part of the first large-scale delivery of tanks to Australia. 320 had been delivered by February 1943 and the last 69 were delivered in small batches over the next year.
The Australians made a number of general changes to the Matilda, including giving it an armoured turret ring and installing a cast shield over the front of each track to stop undergrowth getting into the tracks and suspension. An infantry tank telephone was fitted at the left-rear of the tank to allow for easy communication between the tank commander and the troops he was supporting.
Most tanks also needed quite a bit of work to repair the damage done during the sea journey.
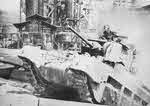
The Australians made extensive use of the Matilda on New Guinea. Here the heavy armour was a key factor, making it almost immune to most Japanese anti-tank weapons for most of the war. Even when the Japanese did get better anti-tank guns later in the war few of them reached isolated New Guinea.
The Matilda entered combat on New Guinea during the fighting at Satelberg and Finschhafen, at the tip of the Huon Peninsular, in November 1943. 'A' and 'C' Squadrons, 1st Australian Army Tank Battalion, took them into combat, and they played a major part in the Australian victory.
The Matilda was ideally suited to operations in the difficult jungle terrain. The tanks could operate in support of infantry, eliminating Japanese bunkers in the difficult jungle terrain. The fighting was often at very short ranges, and for once the short-range 3in howitzer proved to be an effective weapon, inflicting serious damage on Japanese bunkers from almost point-blank range.
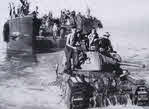
The Matilda gun tank remained in Australian use in the Pacific to the end of the war. Late in 1944 the Australians took over from the Americans on Bougainville, and went onto the offensive. Two Matilda squadrons from the 2/4th Australian Armoured Regiment took part in the fighting, and were in action from March 1945 to the end of the war. A third squadron from the same regiment took part in mopping up operations around Wewak on New Guinea.
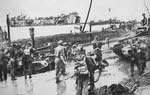
The Matilda's final operations as a gun tank came on Borneo. In July 1945 tanks from the 2/9th Australian Armoured Regiment took part in the landings at Tarakan, Labuan and Brunei Bay, while the 1st Armoured Regiment landed at Balikpapan. The Balikpapan attack was the largest Australian armoured operation of the Pacific War and involved 33 tanks, including the Matilda Dozer and Matilda Frog flamethrower.
The biggest problem was a lack of spare parts, especially once the tank went out of production. Even so the Matilda battled on after the war, and from 1948 until 1954 they were used to equip one armoured brigade in the Australian Citizen Military Forces. The tanks used in this role had been used on training duties in Australia during the war.
Other Service
The Matilda was shipped to Russia in large numbers. Just over 1,000 were sent, and 750 arrived safely. They can't have been a very popular weapon in Russia, with a tiny gun by contemporary standards and slow speed. They also suffered from a tendency for mud and snow to get trapped behind the armoured side skirts, clocking up the suspension.
New Zealand received 33 Matilda Mk IVCS close support tanks, to operate alongside the Valentine in a planned tank brigade. They were never used in that role, and instead their guns were used on Valentines and the tanks given to the Australians.
After that used in special purpose roles, especially as mine-clearing vehicle - specially designed Baron and simplier Matilda Scorpion Mk I.
Variants
Matilda Mk I Infantry Tank Mk II
The Mk I was armed with the 2-pounder gun and a water-cooled Vickers machine gun. It was powered by twin AEC diesel engines.
Matilda Mk II Infantry Tank Mk IIA
The Mk II saw the Vickers gun replaced by a 7.92mm Besa machine gun. It retained the AEC engines.
Matilda Mk III Infantry Tank Mk IIA*
In the Mk III the AEC engines were replaced with more powerful Leyland diesel engines.
Matilda Mk IV Infantry Tank Mk IIA**
The Mk IV saw a number of detailed improvements, most importantly the use of a rigid engine mounting in place of the earlier three-point mounting that have proved vulnerable to damage.
Matilda Mk V Infantry Tank Mk IIA**
The Mk V was almost identical to the Mk IV, but with a modified transmission system to improve gear changes.
Matilda Canal Defence Light
The Matilda CDL had a powerful searchlight mounted in an armoured lighthouse that replaced the turret. The idea was to use the flickering light to blind night-time opponents. Although the idea appears to have worked, the CDL wasn't used in combat until the Rhine crossing of 1945, by which time the Matilda CDL had been phased out.
Baron
The Baron was a mine-clearing vehicle produced in Britain, and using flails to detonate mines
The Matilda Scorpion I was a similar vehicle developed in North Africa. It was less complex than the Baron, and was adopted for limited production, mainly as the Valentine Scorpion II.
The Matilda AMRA Mk Ia was a mine detecting vehicle, pushing four heavy rollers attached to a frame in front of the tank. The rollers would detonate any mines they ran over, allowing mine sweepers to get to work.
The Matilda with Carrot carried an explosive charge on an AMRA frame. It was designed to blow up obstacles or set off minefields through sympathetic detonation
The Matilda Frog was an Australian-produced flamethrower tank that saw some use of Borneo in 1945. It used gas to propel the flames, and thus needed 20 seconds between bursts to recharge the pressure.
The Matilda Murray was a flame-thrower tank that replaced the gas pressure with cordite, allowing for more rapid fire. It arrived too late to see service.
The Matilda Dozer was an Australian produced modification with a full size bulldozer blade on the front of the tank. Steering was difficult and was nose heavy and tended to dig itself in, so wasn't a great success.
Stats
Names
Matilda Mk I Infantry Tank Mk II (A12)
Stats
Hull Length: 18ft 5in
Hull Width: 8ft 6in
Height: 8ft 3in
Crew: 4 (commander, gunner, loader, driver)
Weight: 59,360lb (battle weight)
Engine: Twin 87hp AEC diesels (Mk I-II), then Twin 95hp Leyland 6 cylinder engine
Max Speed: 15mph
Max Cross-country speed: 8mph
Max Range: 160 miles on road
Armament: One 2pdr OQF gun, Vickers MG in Mk 1, 7.92mm Besa MG in others
Armour: 13-78mm
Armour
| Armour | Front |
Side |
Rear |
Top/ Bottom |
Turret |
37.5m |
75mm |
75mm |
20mm |
Hull |
78mm |
40mm |
55mm |
20mm |
Hull Skirt |
|
25mm |
|
|