|
|
|
|
Mk I Series I
The Stirling Mk I Series I retained the Bristol Hercules II engines, giving 1,425 hp. More powerful engines had been expected, but were not developed in time. As a result the performance of the Mk I was disappointing. It was much lower than had been predicted. When loaded to 57,400 lbs, it had a maximum speed of 218 mph, a cruising speed of only 165mph at 10,000 feet, and a service ceiling of only 15,000 feet. It had a climb rate of 900 feet per minute to 5,000 feet, dropping to only 160 feet per minute above 10,000 feet. When fully loaded the Mk I weighed 75,400 lbs and took 34 minutes to reach 15,000 feet. The low service ceiling became an increasing problem as the operational altitude preferred by Bomber Command steadily increased.
The Mk I Series I carried three Frazer Nash gun turrets – the two gun FN5A in the nose, the four gun FN4A turret at the rear and a two gun retractable FB25A ventral turret underneath the aircraft, each using the standard .0303in machine gun. The ventral turret was not a success. It had a tendency to lower itself when the aircraft taxied, suffered from poor visibility, and slowed the aircraft by around 10 mph (the same problems had caused the removal of a similar turret from the early Wellington bombers).
The Mk I Series I was assigned to training duties for most of its RAF career, although it was aircraft of this type that took part in the first raid by Stirling, against oil tanks at Rotterdam on 10 February 1941.
Mk I Series II
The main change made for the Series II Stirling was the removal of the FN25A ventral turret. Provision was instead made to carry two .303in Browning machine guns in side windows in the fuselage (just as in the Wellington). The FN4A turret at the rear was also replaced by the superior FN20A, also with four .303in machine guns. Eighty aircraft were built in the first and second series of Stirlings.
Mk I Series III
The Mk I Series III saw the final change to the Stirling’s defensive firepower. The provision for the side mounted guns was removed, and a Frazer Nash FN7A dorsal turret fitted to the top of the fuselage. A single manually operated machine gun could be attached to the hatch originally used by the dorsal turret. The Series III also saw an engine change, to the 1,500 hp Hercules XI engine. The Mk I Series III carried seven crew – two pilots, a navigator/ bomb aimer, a wireless operator, a flight engineer and two gunners, one less than the number of turrets. The vast majority of the 756 Stirling Mk Is were Series III aircraft.
Mk II
The Mk II was to be a Stirling variant built in Canada using Wright Cyclone R-2600-A5B radial engines, giving 1,600 hp. Four prototypes were produced in England, but tests in the autumn of 1941 were disappointing, and in early 1942 the project was cancelled. Canadian manufacturing capacity could be better used on other aircraft.
Mk III
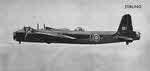
The Stirling Mk III was the ultimate bomber version of the aircraft. The engines were improved again, this time to the 1,635 hp Hercules VI. The climb rate at low altitude was somewhat reduced, but above 12,000 feet it could still manage 300 feet per minute, double the climb rate of early Mk Is. A second improvement was the use of a more streamlined dorsal turret – the FN50A. Maximum speed increased from 216 mph to 270 mph. However the service ceiling was still low, at 16,500 feet, at a time when Bomber Command preferred to operate at 20,000 feet. The narrow bomb bays still remained, restricting the type of bombs the Stirling could carry. The Mk III entered squadron service in January 1943. By the end of that year the Stirling had been removed from front line bombing duties, although still had a role to play carrying out electronic countermeasures.
Mk IV
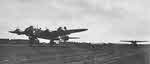
The Stirling gained a new lease of life as a glider tug. The Airspeed Horsa glider had first been towed by the Whitley bomber, but it was recognised that a more powerful towing aircraft was really required. It was only when the Halifax and Lancaster bombers began to appear in large numbers during 1943 that the Stirling became available to carry out that duty.
The Mk IV used the same engines as the Mk III. To save weight the front and dorsal turrets were removed, although the rear turret was retained. Glider towing equipment was attached below the rear fuselage. A small number of Mk IVs also had a large exit hatch for paratroops added under the aircraft. The Mk IV could carry twenty fully equipped paratroopers.
The Mk IV entered service in January 1944, and by the summer equipped six squadrons in No. 38 Group. The Stirling Mk IV was active on D-Day and was involved in every significant airborne operation for the rest of the war in Europe.
Mk V
The Mk V was a transport aircraft proposed at the same time as the Mk IV. The nose and tail turrets were both removed to reduce weight. A large side door was fitted to the starboard side of the aircraft. A second cargo entrance was created by making the nose open upwards, with retractable block and tackle to help lift heavy weights up to the high nose of the Stirling. The Mk V had a short military career, entering service late in 1944 and being phased out in the middle of 1946. It had arrived too late to help with the great shortage of transport aircraft that had plagued the RAF early in the war.
Production
Mk I |
756 (all but 80 Mk I Series IIIs) |
Mk II |
Prototype |
Mk III |
875 plus many conversions. |
Mk IV |
577 |
Mk V |
160 |
Mk I Series I
Cruising Speed |
165 mph at 10,000 ft |
Engine |
Hercules II |
Horsepower |
1,375 |
Max Speed |
218 mph |
Ceiling |
15,000 feet |
Climb Rate |
900 feet per minute to 5,000 feet |
Mk I Series III
Max speed |
255 mph at 10,000 ft at 70,000 lbs |
|
230 mph at 16,000 ft at 70,000 lbs |
Crew |
Seven |
Engine |
Hercules XI |
Horsepower |
1,500 hp |
Mk III
Max Speed |
270 mph at 14,500 ft |
Ceiling |
16,500 ft |
Bomb load |
15,000 lbs |
Crew |
Seven |
Engine |
Bristol Hercules VI or XVI |
Horsepower |
1,635 |
Range |
2,010 miles with 3,500 lb bomb load |
Rate of climb |
500 feet per minute at takeoff |