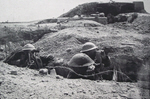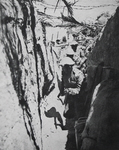
Trench on the Mareth Line
|
|
Background
Axis Forces
Allied Forces
Montgomery's Plan
The Battle
Preliminary Moves
Operation Pugalist
Operation Supercharge II
The battle of the Mareth Line (20-26 March 1943) was the Eighth Army's last major setpiece battle in North Africa, and saw Montgomery force the Germans and Italians to retreat from their last significant defensive position in southern Tunisia. The battle also showed that Montgomery could be a flexible commander - after his initial plan for a breakthrough on the coastal front failed, he turned his attention to a wide outflanking movement that forced the Axis troops to retreat.
At the start of his retreat after the second battle of El Alamein Rommel may have been considering attempting to defend a position in Libya, but after the Allies landed in French North Africa (Operation Torch), he realised that the only way to save his army was to retreat into Tunisia, to join up with the new army being built up around Tunis and Bizerte, and ideally use the bridgehead to evacuate the army from North Africa. Mussolini was understandably unwilling to abandon the last part of his African empire without a fight, and attempted to force Rommel to defend a series of defensive positions. The first of these was at El Agheila, the same place where Rommel's First Offensive had begun early in 1941, and his Second Offensive had begun in 1942. Montgomery was aware of this history, and was determined not to give Rommel the chance for yet another comeback. He made sure that his leading troops were well supplied and well organised (not the case for his predecessors in 1941 or 1942), and prepared for a full scale attack on the El Agheila line. Montgomery was aware that he had inherited an army with fairly fragile morale, after the heavy blows it had suffered at Rommel's hands in the past, and was careful to make sure that the army didn't suffer any setbacks that affect its morale.
Rommel had no intention of attempting to hold the line, and so when Montgomery attacked in mid December he found the Axis forces were already retreating towards a new line at Buerat, nearer to Tripoli (battle of El Agheila). Once again Montgomery took a month to prepare for a proper attack on the new line, and once again Rommel retreated without offering battle. This time Montgomery was prepared for this, and had ordered his troops not to stop until they had taken Tripoli. The attack on the Buerat line began on 15 January, and the Eighth Army entered Tripoli, their target since the end of 1940, on 23 January.
In the meantime Rommel continued to retreat, until he reached the Mareth Line in southern Tunisia. The Mareth Line had originally been built by the French to guard against an attack from the Italians in Libya. It ran from the coast across a narrow coastal plain to the Matmata Hills, which ran from north-to-south for some distance. The move into Tunisia also brough Rommel close to von Arnim's 5th Panzer Army, then building up in northern Tunisia. On 24 January 1943, while Rommel was still retreating from Tripoli, von Arnim was ordered to protect the key area around Gabes and Mareth, to stop the Americans from reaching the coast between the two Axis armies. In order to help von Arnim, the 10 Panzer Division had been transferred from Rommel's force.
As his troops began to enter their new position, Rommel suggested that he could combine with von Arnim's 5th Panzer Army, then being built up in northern Tunisia, for an attack on the right flank of the Allied armies advancing into Tunisia from Algeria in the aftermath of Operation Torch. This led to Operation Frühlingswind (14-18 February 1943), von Arnim's part of the offensive, in which parts of the US 1st Armored Division suffered an embarrassing defeat, and Operation Morgenluft (16-18 February 1943), Rommel's rather less dramatic part of the offensive. Rommel was then given command of both forces for the final part of the offensive, an attack north through the Kasserine Pass (19-22 February 1943), but after some initial successes this attack ran out of steam, and on 22 February Rommel cancelled the offensive. Despite the failure of the attack, this apparent revival in his offensive spirit convinced Kesselring to appoint Rommel as the new commander of Army Group Africa. His old army became the Italian First Army, under the Italian General Giovanni Messe (a move that had first been proposed earlier in the year, but delayed until Rommel was ready to go).
On 6 March Rommel launched his last attack in North Africa, a failed assault on the British at Medenine (Rommel came up with the overall idea, but Messe was given the task of producing the detailed plan). This failed attack cost Rommel 52 tanks, and also played a part in ending his time in North Africa. On 9 March he flew out of Tunisia to visit Hitler, with the aim of explaining the real situation in North Africa. Rommel wasn't allowed to return to North Africa, and was told to take sick leave. His place was taken by General von Arnim.
The Mareth Line was a fairly strong position. The Axis left was secured on the sea. Their right wasn't so strong – the line crossed the northern tip of the Matmata Hills then turned north-west to cross another area of flatter ground (the Tebaga Gap) before reaching more high ground at the Djabel Tebaga. The area between the Matmata Hills and the Djebel Tebaga was known as the Dahar, a mix of desert and salt marshes. In the 1930s the Matmata Hills had been seen as largely impassible to military transport and tanks, but by 1943 that was no longer the case.
The main position was protected by the Wadi Zigzaou, a steep sided valley, with sides up to 20 meters tall and water flowing along its base. Most of the French concrete fortifications covered the Wadi Zigzaou. A few miles further south was a smaller valley, the Wadi Zeuss. The area beween the two valleys was filled with minefields and wire, as well as anti-tank guns and other defensive positions. The idea was that artillery in the hills north of Wadi Zigzaou could cover these positions. However Rommel was aware that there were similar hills to the south, from where Allied artillery could hit the new defensive positions.
Rommel had lost at least 30,000 men, most of his tanks and almost all of his 88mm guns at El Alamein. As his battered army retreated west, it gained some strength, collecting troops and weapons from various positions in Libya, and some new equipment arrived from Tunisia. It was also joined by two new Italian divisions, the La Spezia infantry division and the Pistoiamotorised division. However he wasn't terribly impressed with the Mareth Line after inspecting it in more detail, and by early February was seriously considering a further retreat to the Wadi Akarit position, north of Gabes, where there was another narrow gap, this time protected on the inland side by the Chott el Fedjadj, a series of salt marshes.
During the fighting at the Mareth Line Messe commanded a mix of Italian and German troops,
The Italian XX Corps (General Orlando) contained the Young Fascist division, the Trieste division and the German 90th Light Africa Division.
The Italian XXI Corps (General Berardi) contained the La Spezia division, the Pistoia motorised division and the German 164th Light Africa Division.
The Afrika Korps (General Cramer) contained the remains of 15 Panzer Division and 21 Panzer Division.
Messe also had the Italian Saharan Group, a force of around 2,500 men made up of garrison troops from southern Libya.
10 Panzer Division was part of the 5th Panzer Army reserve, but could be called south if needed.
Messe posted a mix of Italian and German troops in the front line. On the left, nearest to the coast was the Young Fascist division, with the Trieste division to its right (both part of XX Corps). They were supported by the 88mm and 20mm anti-aircraft guns of the Luftwaffe 19. Flak-Division.
The centre of the line, across the main road to Gabes, was held by the German 90th Light Afrika Division.
The right of the main line was held by the La Spezia and Pistoia divisions, both part of XXI Corps.
On the far right, where the line rose up into the hills, the German 164th Light Africa Division was posted.
On the right-rear, towards the Tebaga Gap, was the Saharan Group of nine infantry battalions and 1 batteries of guns.
Messe had two lines of reserves. Closes to the front were the 1st Luftwaffe Brigade, Panergrenadier Regiment Afrika and 15 Panzer Division. 21 Panzer was further back, in a position to move to whichever part of the line was threatened. Finally 10 Panzer was posted to the north of Gabes, where it could intervene on the Mareth Line or against an American advance from the north-west.
In total Messe probably had 50,000 German troops, 35,000 Italians, 440 guns and 140 tanks.
Montgomery had lost some of his units after the battle of El Alamein, in particular the Australian 9th Division, which had returned home to defend against a possible Japanese invasion, and the South African 1st Division, which had returned to South Africa to be converted into an armoured division. During the attack on the Mareth Line his army was split into three corps.
The New Zealand Corps (Freyberg) contained his own 2nd New Zealand Division, the 8th Independent Armoured Brigade and General Leclerc's French 'L' Force, which had crossed the desert from Chad.
XXX Corps (Leese) contained the rest of the infantry, and was made up of the 50th (Northumbrian) Division, 51st (Highland) Division, 4th Indian Division and 201st Guards Motor Brigade.
X Corps (Horrocks) contained the armour, and was made up of the 1st Armoured Division and 7th Armoured Division. 1st Armoured had the 2nd Armoured Brigade and 7th Armoured had the 4th Light Armoured Brigade and the 22nd Armoured Brigade.
Montgomery's army wasn't as large or a strong at Mareth as it had been at El Alamein, at least in part because Montgomery didn't want to overstretch his lengthy supply lines, but it was still much better equipped than Messe's First Italian Army. The Eighth Army had 743 operational tanks and 692 guns at the start of the battle.
Montgomery decided to carry out a two-pronged assault on the Mareth Line. On the coastal flank (the right) the 50th Infantry Division and 23rd Armoured Brigade from XXX Corps were to attack along the coast. On the left the New Zealand Corps (2nd New Zealand Division, 8th Armoured Brigade, Leclerc's Free French troops from Chad, an armoured car regiment from the 1st King's Dragoon Guards and extra medium artillery), was to try and advance around the Matmata Hills to get behind the western end of the line. Once XXX Corps was through the front line it was to swing left to get behind the rest of the Mareth Line, while X Corps advanced through the gap and made a dash north heading for Gabes and beyond that Sfax.
The biggest problem with the plan was that the initial attack on the coast was only made by two infantry battalions, from the 151st Brigade, 50th Division. Exactly why such a small force was used isn’t at all clear, although given that Rommel had refused to stand and fight on any previous defensive line since El Alamein, Montgomery might well have expected the same to happen here, and was marshalling his strength for the breakthrough and pursuit.
The preliminaries for the attack began on 11 March when the New Zealand corps left the Medenine area heading south towards their crossing point over the hills. The next stage was a series of preliminary operations, designed to push the Axis back from the Wadi Zeuss to Wadi Zigzaou. These operations began on the night of 16-17 March, with 50th Division operating on the right and 51st Division on the left. Both of these attacks went as planned, and the infantry advanced up to the main defensive position. On the far left the 201st Guards Brigade attempted to capture some high ground beween the wadis, but ran into the 90th Light Division. The Guards took their objectives, but heavy enemy fire meant that they couldn't be reinforced during 17 March,and on the night of 17-18 March they withdrew to their starting points.
These preliminary operations took place at the same time as the start of Operation Wop, Patton's limited offensive south of Kasserine. The Americans recaptured Gafsa, taken from them during the preliminaries before the battle of the Kasserine Pass, and posed a threat to Messe's rear.
On the night of 19/20 March the New Zealand Corps crossed the hills via Wilder's Gap (discovered by Captain Nick Wilder DSO, commander of the New Zealand Long Rage Desert Group patrols, on a patrol that began in early January, well before the fall of Tripoli), and reached their planned assembly area west of the hills. The Free French moved into the hills to screen this advance. The original plan was for them to wait there all day and then continue their advance on the night of 20/21 March, but they were detected early on 20 March and ordered to continue their movement during the day. By the end of the day they were close to the Tebaga Gap. The detection of their move allowed Messe to move the Saharan Group into the Tebaga Gap.
The 50th Division (Operation Pugalist) attack began at 2145 hours on 20 March with an artillery bombardment. The infantry then had to move off at 2315 hours. They had to cross the Wadi Zigzaou, a strong defensive position that had been improved by the Axis forces and was defended by a series of strongholds. Their attack began well. On the left the 8th Durham Light Infantry, 151st Brigade, captured the Ouerzi strongpoint. On the right the 9th Durham Light Infantry, 151st Brigade, captured the Ksiba Ouest strongpoint. However this attack was only conducted by a single brigade, leaving it vulnerable to counterattack. Finally, to the left of the main attack, the 7th Green Howards from the 69th Brigade advanced through the German anti-tank lines to screen the left flank of the attack.
The plan began to go wrong early in the morning of 21 March. Tanks of the 50th Royal Tank Regiment were meant to cross the Wadi to support the infantry, but the plan didn’t work. The idea was for sappers to blow a gap in the near side of the wadi. The tanks would drive down into the wadi, drop fascines into the water, and cross to the far side. Unfortunatly the bottom of the wadi was softer than expected and the tanks soon got bogged down. The lead tank got stuck in the water, forcing other tanks to try and move around it, with poor results. The tanks then came under heavy artillery fire, and only four Valentine tanks made it across. The attempt was abandoned at first light and the rest of the regiment retreated to its starting point.
For most of 21 March the two battalions in the lodgement came under attack by the Italians, supported by the 90th Light Africa Division. The British defenders managed to hold on throughout the day, and after dark the 5th East Yorkshire Regiment, 69th Brigade, crossed into the lodgement, and attacked to the right, taking the Ksiba Est strongpoint next to the coast. The rest of 50th RTR's tanks also made it across.
21 March also saw the New Zealand Corps conduct its first attack on the Tebaga Gap, but without success. After being detected they had been ordered to advance as quickly as possible, and had moved throughout the day on 20 March. The going was more difficult than had been expected, and they weren’t able to attack on the night of 20-21 March as expected. Instead they made contact with the defenders of the gap on the afternoon of 21 March, but the Saharan Group had a strong defensive position and was able to hold its ground. On the same day Messe ordered the German 164th Light Africa Division to move to Tebaga to reinforce the defences, having only now realised that an entire division and an armoured brigade was heading for the gap.
On the night of 21-22 March the 9th Durham Light Infantry advanced from Kisba Ouest and captured the Ksiba strongpoint to the north and the Ouerzi strongpoint to the north-west. On the left flank the 6th Durham Light Infantry crossed the Wadi and captured The Zarat Sudest and the Ouerzi Ouest strongpoints, to the west and north of the Ouerzi strongpoint. At this point the attack appeared to be going quite well, with seven strongpoints now in British hands, but the lodgement was still mainly held by infantry. The 50th Royal Tank Regiment made another attempt to cross the wadi during the night, but this also failed.
The night of 21-22 March also saw the first large scale attack on the Tebaga line. The 25th and 26th New Zealand Battalions attacked towards an old Roman wall that had been turned into a powerful defensive position. Supported by a heavy artillery bombardment, the infantry managed to break through the lines. There was briefly a chance for an armoured breakthrough, but the command of the 8th Armoured Brigade didn't want to attack in the dark. By the time it was light the first German troops had arrived, and 22 March was filled with a series of generally unsuccessful attacks.
On 22 March rain partially filled the Wadi Zigzaou and also kept the Desert Air Force grounded. Messe used the 15 Panzer Division to counterattack against the 50th Division break in. The attack began at 0145 hours, and hit the left flank of the British lodgement. The 151st Brigade was slowly forced out of its lodgements, and back towards the edge of the Wadi. On the right the 5th East Yorkshires were expelled from the Ksiba East strongpoint.
On the night of 22-23 March the British position in the lodgement became increasingly vulnerable, and General Nichols, commander of the 50th Division, realised that the position was about to be overrun. He asked General Leese, his corps commander, for permission to withdraw. Leese woke Montgomery early on 23 March, and got his permission to withdraw. All surviving tanks and infantry pulled back across to the British side of the Wadi Zigzaou. The frontal assault on the Mareth Line had failed.
At this point Montgomery decided to switch his main effort from the coastal attack on his right to the New Zealander's outflanking move. 50th Infantry Division was ordered to stop its attacks. XXX Corps (7th Armoured, 50th and 51st Infantry Divisions) were ordered to attack in the centre of the Mareth Line, to keep the German reserved pinned down in that area. He also began work on a new route across the Matmata Hills, passing just to the south of the Axis front line. This had two purposes – the first was to speed up the movement of troops between his main position and the isolated position in front of the Tebaga Gap. The second was to create a starting point for a 4 Indian Division attack around the right flank of the Mareth Line, which he hoped would cut the coast road between Mareth and Gabes. The HQ of X Corps and the 1st Armoured Division were to join the New Zealanders. General Horrocks would take over control of the battle, leaving Freyberg free to concentrate on his own division.
On the night of 23/24 March/ On the same night the HQ of X Corps and the 1st Armoured Division began a move around the hills to join the New Zealanders.
On 25 March Messe discovered that reinforcements were moving towards the Tebaga Gap, and decided to send the 21 Panzer Division to join the defenders. On the same day von Arnim ordered a retreat from the Mareth Line to the Wadi Akarit position, to start with the Italian infantry. It was clear that Montgomery's outflanking move would soon turn the Mareth Line position into a trap.
The main attack was now to happen in the Tebaga Gap (Operation Supercharge II). It was to be preceded by an aerial bombardment that would start late on 25 March and continue to 1500 hours on 26 March. This would be followed by an hour long bombardment, before at 1600 the New Zealanders and 1 Armoured Division would attack out of the setting sun. The air attack would be unusual, in that it would involve low level cannon attacks as well as high level bombing, at that time something of a novelty.
The aerial attack was delayed by a dust storm that lasted until mid-afternoon on 26 March. When this ended the Desert Air Force was able to carry out two and a half hours of attacks before the ground attack began as planned at 1600 hours. The attack was carried out in an unusual formation. The Grant and Sherman tanks led the way, followed by the New Zealand infantry in bren carriers. The lighter Crusader tanks were next, followed by more mobile infantry. Finally came the unmounted infantry.
The New Zealanders were first to break through the Axis lines, followed by the 1st Armoured Division. Only 12 Shermans, one Grant and three Crusaders were lost during the attack phase. By the time darkness stopped the advance they had pushed forward 6000 yards. The fighting resumed after the moon came up, and by first light on 27 March 1st Armoured Division had reached El Hamma (to the north-east of the Tebaga gap, and at the south-western corner of the Gabes Gap), where they were held up by anti-tank guns. The New Zealanders followed up, mopping up any defenders who had been left behind. General Liebestein, the German commander at Tebaga, ordered his left flank to retreat just in time, and also used 15 Panzer Divisoon to attack the right flank of the advancing column. This counterattack was repulsed by the Shermans and the powerful 17 pounder anti tank guns, although by now the division was down to only 10 tanks, and the New Zealand divisional HQ didn't realise at the time that they'd been counterattacked.
The advance stalled somewhat on 27 March. The German anti-tank screen stopped the direct attack on El Hamma, while 15 Panzer and 21 Panzer combined to attack the right flank of the advance once again. The New Zealanders were caught up in battles with the 164th Light Infantry, and weren't able to move up to join the armour until late in the day.
By the night of 27-28 March the Axis forces were in full retreat from the Mareth Line. Attempts to cut them off failed, because of a mix of dust storms, mines and the usual booby traps, combined with a disagreement between Freyberg and Horrocks on which route to take from El Hamma. Even so 15 Panzer, 21 Panzer, 165 Light Division and three Italian divisions had been so badly mauled that they were no longer effective combat units. Only the 90th Light Division emerged from the battle more or less intact. The Allies took 7,000 prisoners by the end of 28 March, and for once the larger number of prisoners were German.
On 29 March the German armour finally retreated from El Hamma, allowing XXX Corps to follow the retreating Axis forces towards the Wadi Akarit position, generally known as the Gabes Gap.
The retreating Axis forces stopped again in the Gabes Gap, the last remaining natural obstacle before the Tunis plains. Once again Montgomery paused before attacking this new position, but not for very long. The battle of the Gabes Gap (6-7 April 1943) only lasted for two days, and ended with Messe in full retreat towards Enfidaville. The Axis forces were being pinned into an increasingly small bridgehead, and the campaign in North Africa was clearly coming to an end.