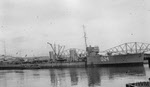
 HMS Miranda (D24) from the right
 |
|
The Miranda was laid down at Yarrow on 6 May 1913, launched on 27 May 1914 and completed in August 1914. The Yarrow specials were the only members of the class to have two funnels.
On 24 September Commodore Tyrwhitt used the Miranda as his flagship when he carried out the first relief of the ships patrolling in the Broad Fourteens, to warn against any German attempt to attack the troop ships heading to Dunkirk. By 18 October, when she was again at sea on the Broad Fourteens she had been replaced as his flagship by the Arethusa.
At this point the eventual use of the M class destroyers hadn’t been decided. The original plan was for them to join the Harwich Striking Force, but on 10 October it was decided to allocate them to Admiral Beatty’s battlecruiser force, as he had asked for a flotilla of 8-10 modern destroyers. The Miranda wasn’t included in this plan, and was retained as second in command of the Third Destroyer Flotilla at Harwich. In the end this plan was abandoned, and the M class destroyers joined the Tenth Flotilla at Harwich. The Miranda had joined that flotilla by June 1915.
In November 1914 she was the flagship of the second in command of the Third Destroyer Flotilla but was having defects repaired at Chatham.
In late November eight destroyers were ordered to move from Harwich to Dover, to patrol to the west of the Dover Patrol, hunting for U-boats, sinking drifting mines and boarding suspicious craft. Six Laforey class destroyers and the Miranda were allocated to this task. On 27 November they swept from Dover to the Needles. On the following day they were ordered back to Dover to look for U-21, which had been operating in the area, but she was ahead of them and had generally stayed close to the French coast. On 30 November the Miranda and her destroyers were ordered to remain at Dover until further orders.
On 15 December the Commodore (T) was ordered to concentrate the First and Third Destroyer Flotillas and all available light cruisers off Yarmouth by daylight on 16 December, as part of a series of movements to counter a possible German raid timed to take advantage of the absence of the battlecruisers that had been sent to the South Atlantic in the aftermath of the British defeat at Coronel. The Miranda was ordered to move ahead to patrol the area around the North Hinder Light Vessel from midnight to 0900. The Admiralty was right to be concerned, but the Germans operated further to the north, bombarding Hartlepool and Scarborough.
1915
In January 1915 she was the flagship of the second in command of the Third Destroyer Flotilla, part of the Grand Fleet, and under the command of the Commodore (T).
At the battle of Dogger Bank of 25 January 1915 the Tenth Flotilla contained the Aurora, Meteor, Miranda, Milne, Mentor, Mastiff, Minos and Morris, organised into a single ‘M’ Division. All eight were awarded a battle honour for Dogger Bank. The fastest four – Meteor, Miranda, Mentor and Milne attempted to keep up with the battlecruiser action, but without success. They did take part in the attack on the crippled German cruiser Blucher, which is probably when the Miranda fired the two torpedoes she fired during the battle.
On 31 January 1915 the Miranda, Manly, Morris, Minos, Matchless, Milne and Murray arrived at Sheerness to act as the escort for minelayers that were to lay a new minefield on the route used by German ships heading along the Belgian coast towards the Dover Straits. The start of the operation was delayed until 4 February by bad weather, and fog stopped work on 7 February. On 9 February the M class destroyers were replaced by eight destroyers from the 3rd Flotilla. They were then used to support an air raid on the Belgian coast which was planned for 11 February, and were back at Harwich on 13 February. The mine laying operation itself continued to 16 February and 3,390 mines were laid.
She was still listed with the Third Flotilla into March 1915.
On 5 March the Miranda and three destroyers from the 3rd Flotilla were sent out to sweep between the various minefields in the area, looking for U-boats. Their patrol took them ten miles to the east of the North Hinder Light Vessel, and they returned to port that evening without finding anything.
From June 1915 she was part of the Tenth Destroyer Flotilla, and she remained with that flotilla into April 1917.
In June 1915 she was one of fourteen destroyers in the Tenth Destroyer Flotilla at Harwich, which was made up of all thirteen ships in the original M class and HMS Medea¸ which had been under construction for Greece and was taken over by the Royal Navy at the outbreak of war.
On 14 June the Miranda and Moorsom arrived at Devonport as part of a larger movement of the Tenth Flotilla.
On 16 June the Miranda, Loyal and Lucifer screened the refitted Temeraire on the first stage of her voyage from Devonport back to the Grand Fleet.
At the start of July 1915 the Tenth Flotilla (Aurora, Manly, Mansfield, Mastiff, Matchless, Medea, Mentor, Meteor, Milne, Minos, Miranda, Moorsom, Morris, Murray and Myngs) was operating from Devonport, escorting troop transports, either incoming from Canada or on their way to the Dardanelles.
On 2 July the Empress of Britain left Liverpool at the start of a voyage to the Dardanelles, carrying 4,500 troops. The Manly, Mentor and Miranda were sent from Devonport to escort her through the Irish Channel. Originally they were to escort her well out into the Western Approaches, but she was slow getting underway, so the Mentor and Miranda were ordered back at 5pm on 2 July to escort the Aquitania¸ which left Liverpool on 3 July with 5,939 troops onboard. The Manly stayed with the Empress of Britain until 9pm, and was then sent to Queenstown to take on oil. She was meant to go on to join the Aquitania, but ran aground off Queenstown in thick fog leaving only the two destroyers to escort the massive liner.
The Mentor and Miranda remained with the Aquitania until 5.10am on 4 July. 20 minutes later U-39 fired a torpedo at the Aquitania, but it missed. The U-boat was on her way back from a raid, so was unable to repeat the attack. On their way back to base the Mentor and Miranda picked up a call for help from the Anglo-Californian, and were able to go to her aid.
The Anglo-Californian was a horse transport bringing 927 horses from Canada to Avonmouth. At about 0800 she was attacked by U-39, attempted to escape, and for the next two and a half hours managed to keep the Germans at bay. At 10.30 the U-boat ordered her master to stop and abandon ship, and with his ship having already been damaged he decided to comply. However at this point a message arrived from Mentor and Miranda asking him to delay for as long as possible. As a result the Anglo-Californian got under way again, but by now the U-boat was at much closer range, and in the resulting bombardment 21 men were killed, including the ship’s master Lt Frederick Parslow RNR (who was award a posthumous Victoria Cross for his actions). When Mentor and Miranda arrived on the scene the U-boat was forced to dive, and the Anglo-Californian was able to reach the safety of Queenstown.
On 17 August 1915 seven destroyers from the 10th Flotilla (Mentor, Minos, Moorsom, Miranda, Manly, Matchless and Medusa) along with four from the 4th Flotilla and the Harwich Light Cruiser Squadron escorted the minelayer Princess Margaret as she laid the first British minefield in the Heligoland Bight. The operation wasn’t a success. The force ran into part of the German 2nd Torpedo Boat Flotilla, and in the resulting clash the Mentor was hit and her bows blown off (but managed to get back to port). The Princess Margaret withdrew when the clash began, and when she turned back she couldn’t find most of the escorts and hadn’t laid any mines when the entire force was recalled because a more powerful German fleet was believed to be in the area.
1916
In January 1916 she was part of the Tenth Flotilla, which was still officially based at Harwich, but that was rather widely scattered at the start of 1916.
On 10 March 1916 the Miranda and Lennox collided.
Early on 24 April two divisions of destroyers (Loyal, Laertes, Linnet, Lochinvar, Legion, Lassoo, Miranda and Lysander) led by the cruiser Nimrod left Harwich in response to the German raid on Lowestoft. They moved north along the coast and joined Commodore Tyrwhitt at about 3.20. Half an hour later the German raiding force came into view, with at least four battlecruisers and six light cruisers. Tyrwhitt’s response was to head south at full speed in an attempt to draw the Germans into a chase. They ignored him, and instead soon opened fire on Lowestoft. Tyrwhitt turned back north to keep in touch with the Germans, although his force of three light cruisers and eighteen destroyers wasn’t powerful enough to risk an attack on the Germans. The German light cruisers then moved south and came into range, but withdrew after the British opened fire. The German battlecruisers responded by ending their bombardment and heading south to support their light cruisers. At 4.37am the light cruisers briefly opened fire at very long range. The British returned fire, but at 4.45 the German battlecruisers reached the scene and opened fire. The light cruiser Conquest was hit and damaged, and the Laertes was hit by fragments from a near miss. The destroyers were ordered to head south away from the action then scatter and make smoke. At this point the Germans had a real chance to destroy the Harwich Force, but their battlecruisers turned away after ten minutes and retired to the east. The light cruisers attempted to follow them, but this effectively ended the destroyer’s part in the fighting.
On 3 September 1916 the Manly, Mansfield, Melpomene and Miranda were part of a larger force that was at Portland (with the 3rd Battle Squadron and five destroyers from the 1st Flotilla), when news arrived that a U-boat was operating between Beachy Head and Cape d’Antifer. The destroyers were there to protect the 3rd Battle Squadron as it carried out gunnery and torpedo exercises. At first this fleet was ordered to remain in port. By the morning of 5 September, when no more news of the U-boat had been received, the battle squadron was given permission to leave Portland, but soon afterwards two new U-boats were detected. The battleships were ordered to remain in port, while her destroyers were sent out to try and find the U-boats. They remained involved in this search until 17 September, but without success. On 18 September they escorted the battle squadron back to its base in the Thames.
On 13 September, while this hunt was going on, the Miranda damaged the British submarine C.20.
In October 1916 she was part of the Tenth Flotilla at Harwich, which now contained all thirteen of the original M class ships, the flotilla leader HMS Nimrod and the ex Greek destroyer HMS Melpomene.
1917
In January 1917 she was one of eight destroyers from the Tenth Destroyer Flotilla that were detached at Dover.
The Miranda was still assigned to the Tenth Flotilla until April 1917
When the Germans raided into the Dover straits on 20 April the Miranda was part of the 1st Sub-Division of the reserve or striking force. At about 11.30pm the Germans opened fire on Dover, but Admiral Bacon decided not to order the reserve force to move until the bombardment was over. The final order to sail didn’t come until 11.55, by which time the Germans were safely on their way home. The Miranda’s sub-division was first to leave the harbour, but was still too late to catch the Germans. However the Germans did run into the flotilla leaders Broke and Swift, leading to one of the most famous incidents of the war, when the German destroyer G.42 and HMS Broke became entangled and the Germans attempted to board the Broke, leading to one of the few examples of a boarding action during the First World War.
By May 1917 the Miranda had been officially transferred to the Sixth Destroyer Flotilla at Dover, and by July she had been joined by her entire class.
In June 1917 she was part of the Sixth Destroyer Flotilla at Dover, but was undergoing a refit at Portsmouth.
At the start of June the Manly, Mentor, Moorsom and Miranda were part of the bombardment force that attempted to bombard Ostend. This force left Dover at 10pm on 4 June, while support forces left Harwich. The bombardment itself was carried out early on 5 June, and although the monitors Erebus and Terror fired 115 shells at the port little serious damage was done. The force then returned to base safely.
1918
In January 1918 she was part of the large destroyer force at Dover.
In June 1918 she was part of the Sixth Destroyer Flotilla at Dover,
On 30 July 1918 the Miranda and Phoebe collided off the South Goodwin Light Vessel.
In November 1918 she was one of eleven destroyers that had been transferred from Dover to form the Twenty-First Destroyer Flotilla, under the command of the Grand Fleet.
On 7 November 1918 the Miranda and Phoebe collided off Muckle Skerry, a long
In November 1919 she was in the hands of a care and maintenance party in the Nore Reserve.
The Miranda was awarded battle honours for Dogger Bank 1915 and the Belgian Coast 1916/18.
Wartime Service
November 1914-March 1915: 3rd Destroyer Flotilla
June 1915-April 1917: 10th Destroyer Flotilla, Harwich
May 1917-August 1918: 6th Destroyer Flotilla, Dover
November-December 1918-: 21st Destroyer Flotilla, Grand Fleet
Displacement (standard) |
850t |
Displacement (loaded) |
990t |
Top Speed |
35 knots |
Engine |
2-shaft Brown-Curtis turbines |
Range |
|
Length |
269ft 6in oa |
Width |
25ft 7.5in |
Armaments |
Three 4in/ 45 QF Mk IV guns |
Crew complement |
79 |
Laid down |
6 May 1913 |
Launched |
27 May 1914 |
Completed |
August 1914 |
Sold for break up |
October 1921 |
 British Destroyers From Earliest Days to the Second World War, Norman Friedman. A very detailed look at the design of British destroyers from their earliest roots as torpedo boat destroyers, though the First World War and up to the start of the Second World War, supported by vast numbers of plans and well chosen photographs [read full review]